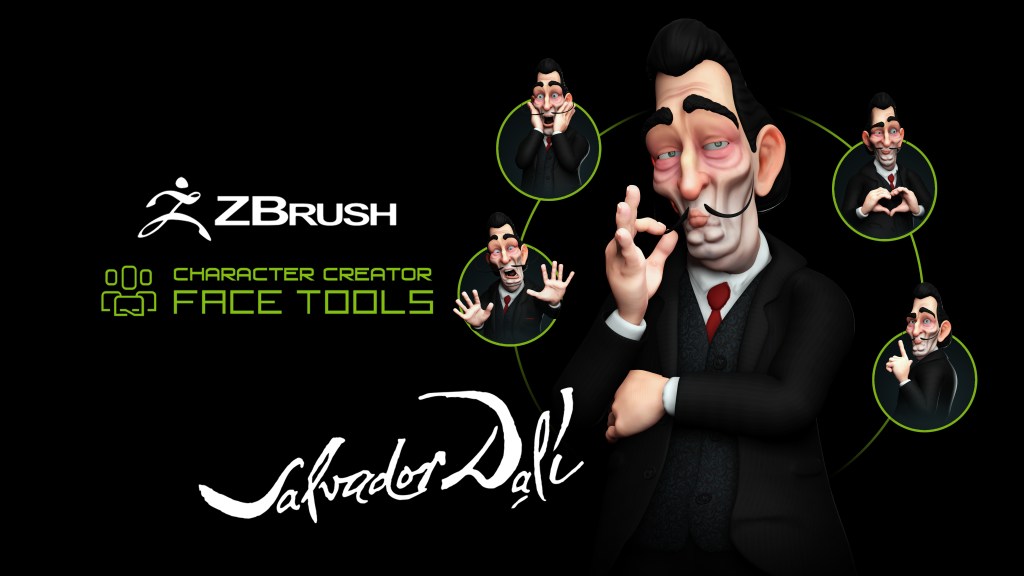
Using Character Creator ZBrush Face Tools for Stylized ZBrush Expressions
Embark on a sculpting journey with Óscar Fernández, a digital sculptor specializing in 3D printing and collectibles. Join him as he unveils a groundbreaking workflow for effortlessly crafting expressive facial expressions for his Salvador Dalí with ZBrush with Character Creator.
Discover professional results without the complexity of traditional approaches, thanks to the revolutionary Character Creator ZBrush Face Tools. Elevate your artistic process and unleash your creativity with Óscar’s innovative techniques to dive into the world of digital sculpting like never before!

DIGITAL 3D SCULPTOR ÓSCAR FERNÁNDEZ
Hi artists! My name is Óscar Fernández, I am a digital sculptor. My work usually centers on figures for 3D printing or collectibles. I’d like to demonstrate a workflow for creating Stylized ZBrush Expressions, achieving professional results without complex technical processes. This method avoids starting from scratch or using traditional approaches.
For ZBrush enthusiasts like us, the system presented below is revolutionary. We only need to focus on the artistic process because the Character Creator ZBrush Face Tools handle everything else seamlessly.
INITIAL IDEA / REFERENCES / SKETCHES
This time, we are going to take an icon of universal art: Salvador Dalí.
To try to push the capabilities of Face Tools to the limit. I will make a caricature of the character, so the first thing is to start with a graphic documentation. I will start by doing a search for real Dalí photos. Since I am not a very good draftsman, I have also looked for references to some caricatures to analyze. I’m looking for the most representative face deformations and thus make my own version.
To try to push the capabilities of Face Tools to the limit. To create a caricature of the character, I begin with graphic documentation, searching for real Dalí photos. As I’m not a proficient draftsman, I also seek references from caricatures. Analyzing representative face deformations guides me in crafting my unique version.
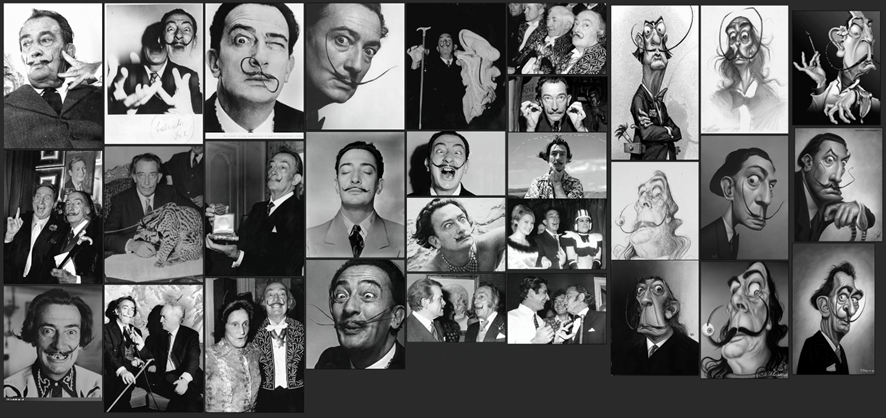
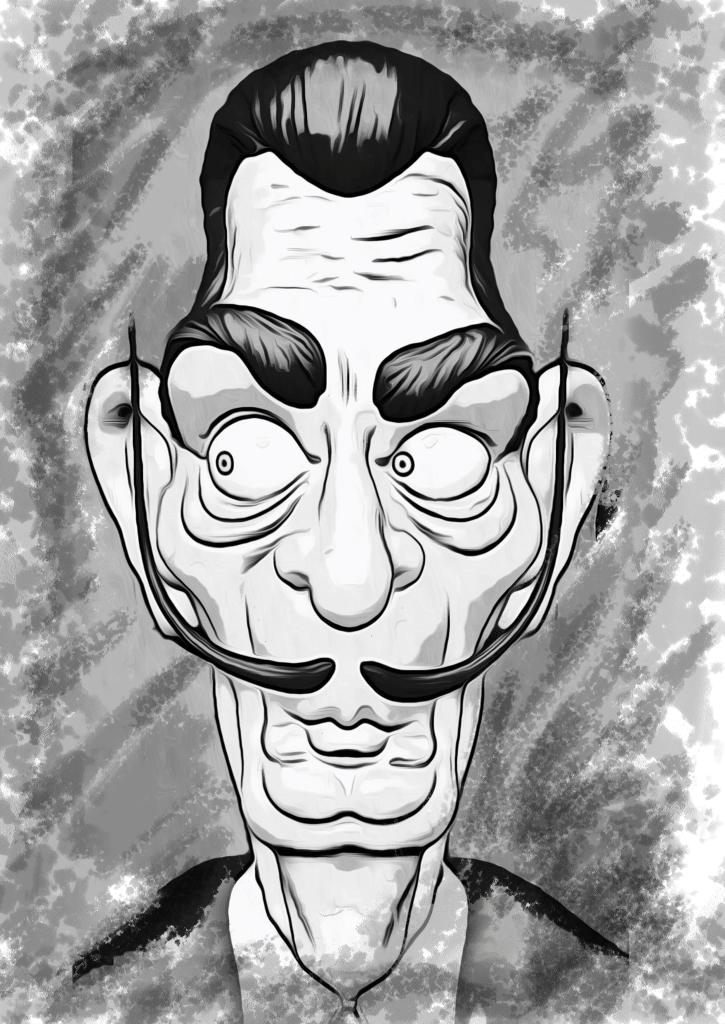
I know, I know… it’s not wonderful, but at least I now have a direction to start working on my model.
Round eyes with small pupils to emphasize the painter’s eccentric point. I think about well-defined lips and his characteristic mustache be to make the character perfectly recognizable and also likeable.
If all goes well, the 3D version will improve throughout the process.
DESIGNING THE BASE FROM CHARACTER CREATOR
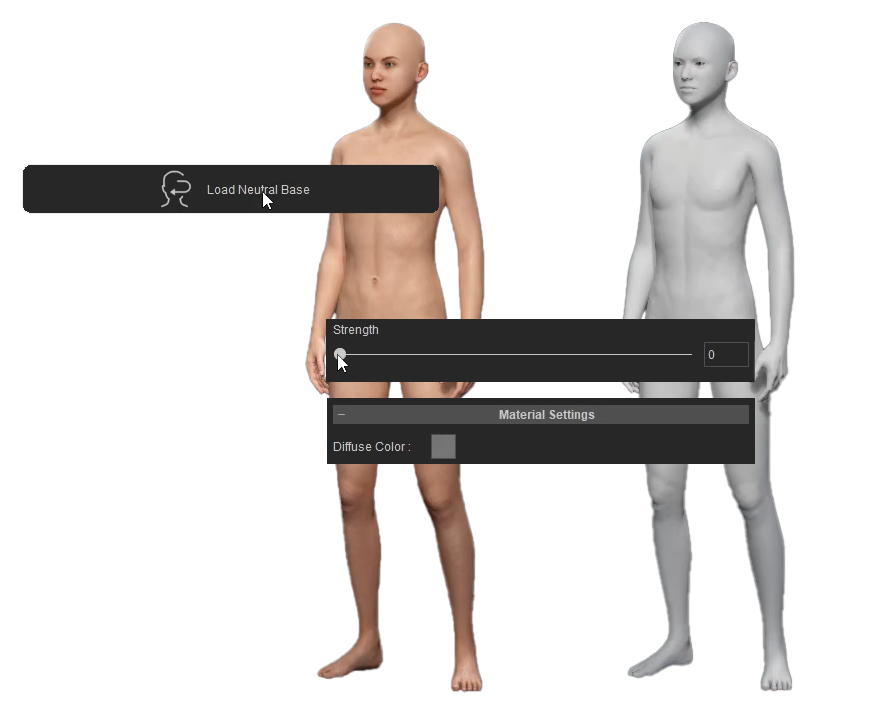
Our project will start by using a base model of Character Creator (CC4). The mesh of this model provides us with a universal topology, perfect for animation and of course for sculpture.
Once the model is loaded, we can go to the Materials tab. There we will lower the intensity of the textures to zero and focus only on the volumes.
I am going to continue creating the base of our character from the “morphs” tab. We will use the combination of two CC4 characters to give a cartoon appearance to the body of our model. I will also load some eyes and teeth in accordance with the style. Lastly, I will load the neutral wrinkle set. Everything ready, we’re going to ZBrush!!

TRANSFER THE MODEL TO ZBRUSH
Once the base of our model is configured in Character Creator (CC), we will use the ZBrush Face Tools button. This is to transfer the character to ZBrush. We will open the first window of the tool and we begin the configuration:
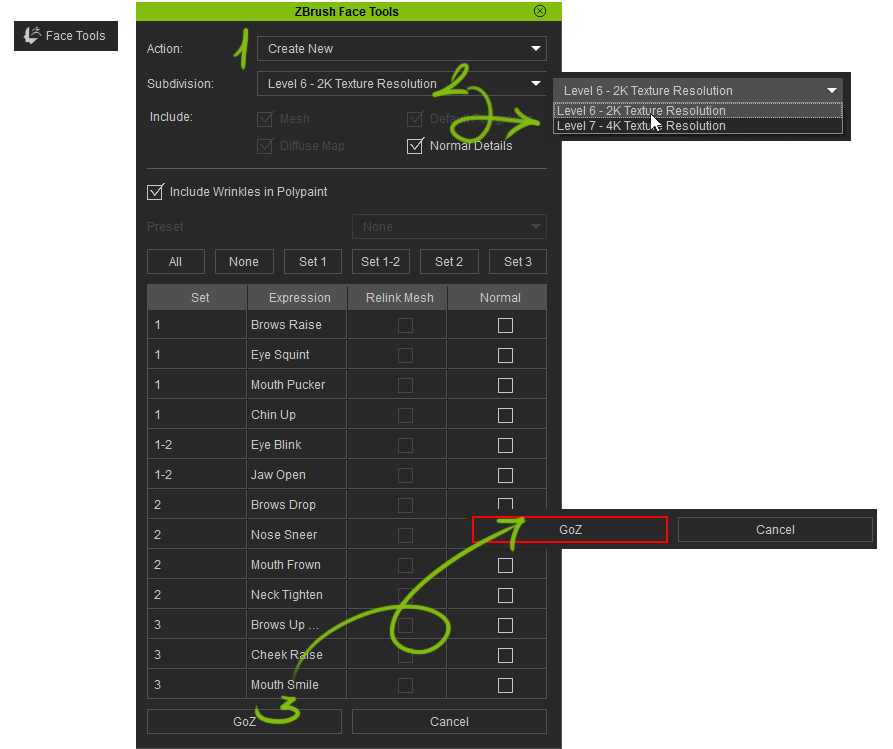
This is the first time we send the character to ZBrush, we will select “Create New” in the Action field.
The next field corresponds to the number of subdivision levels in ZBrush. When the Normal, Diffuse and Cavity maps are subsequently created. The level 6 will correspond to a 2K resolution and level 7 to a 4K resolution. In my case, 6 levels will be enough… We check the “Normal Details” box and finally “GoZ” to send the character to ZBrush.
Once the model has been loaded we will only see the head. Since this tool is focused on the character’s face work. We go to Zplugin and open ZBrush Face Tools.
Before starting to work I am going to configure my project: the background color, the canvas size, some rendering parameters. I will save my file as a project in both ZBrush and Character Creator.
HEAD MODELING IN ZBRUSH
In the plug-in panel we can activate the “Range” option to load a texture. This will enable us to see both the topology of the mesh and the regions that will be affected by the different expressions.
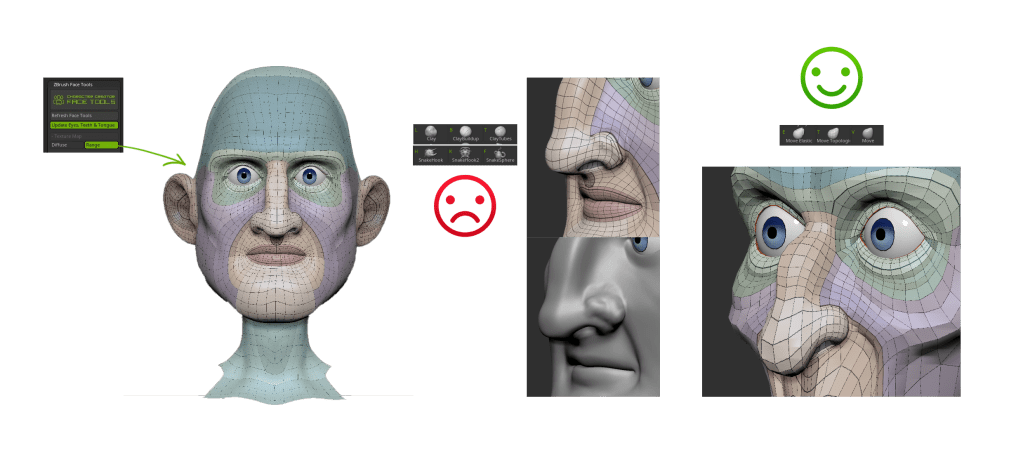
If you are a “traditional” digital sculptor you must keep in mind that we are already starting from a perfect topology. So it is very important to try to respect directions of the loops to obtain optimal results. We are going to avoid using brushes that “add material”. Brushes like all the Clay variants or those that deform the topology too much like Pinch, Snake Hook, etc…
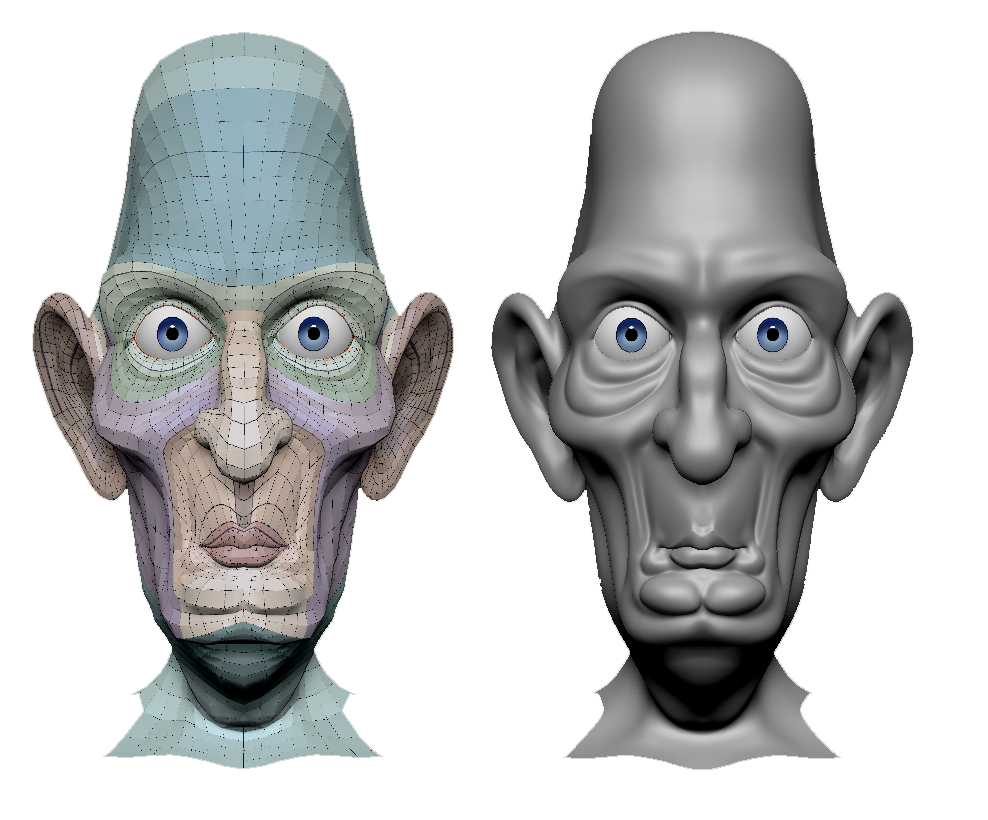
The idea is to work at subdivision level 1 to achieve the basic shape. And work with brushes like Move or DamStandard. These are to deform the mesh little by little. While always looking for smooth lines in those loops that we mentioned.
If the low poly mesh works, then the high poly will generate very smooth and continuous lines that will work perfectly when deformed in the expressions.
FINISHING THE FACE: HAIR / EYEBROWS / MUSTACHE
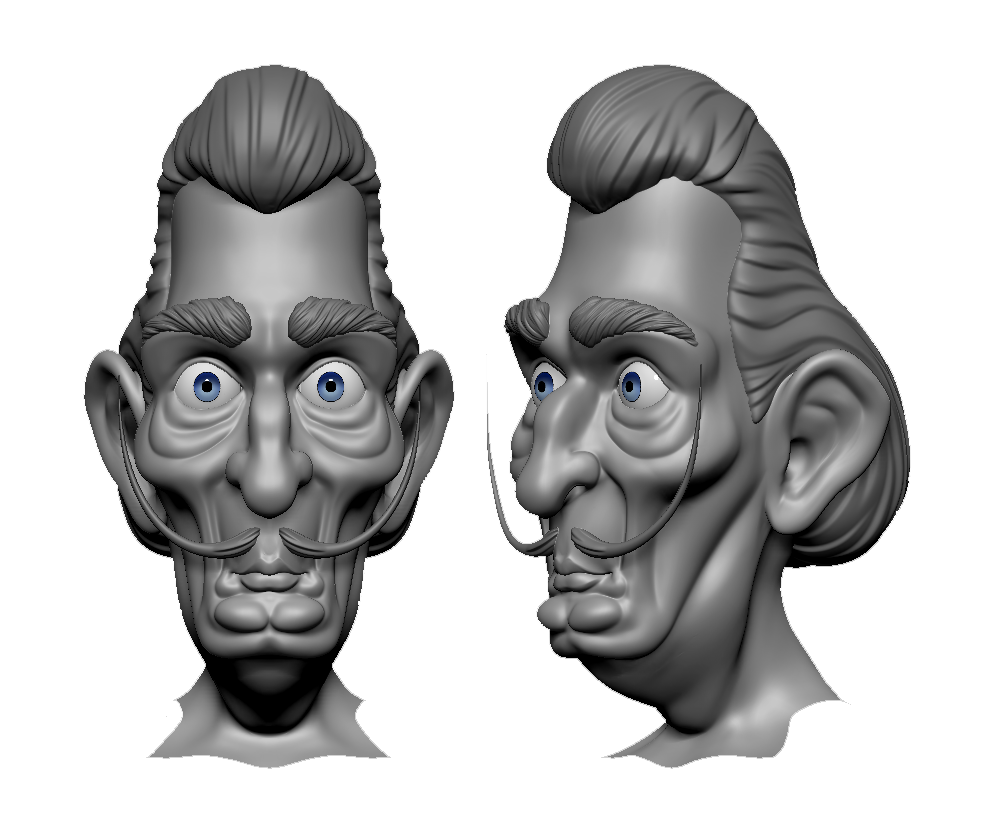
For the hair and eyebrows, I simply made a mask in the corresponding area, I used Extract to generate the mesh and, after making the basic shape, I used ZRemesher to have a neat mesh in which I can subdivide a couple of times and add some detail with the “Slash 2” brush.
Once this is done, I only have to adjust the position of the teeth and tongue and I have everything ready to send the character back to CC4 and check how it behaves. To carry out this process, just click on “Update to Character Creator”
BACK TO CHARACTER CREATOR

** Before updating your ZBrush model back to CC, make sure the CC3+ model is selected in CC. Selecting any other mesh or props will trigger a pop-up in CC and cancel the update process.
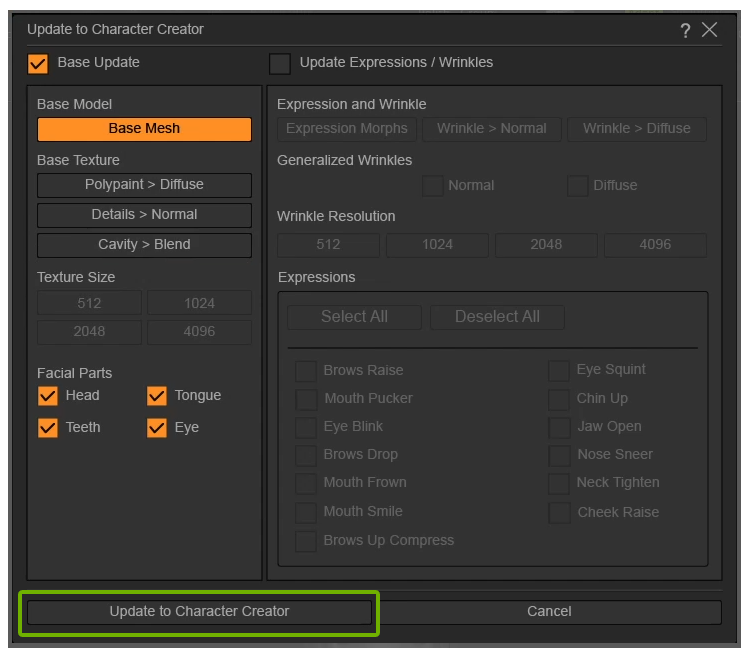
When you press the “Update to Character Creator” button, a window will open that may be a little scary at first, but now we will see that it is incredibly easy to understand.
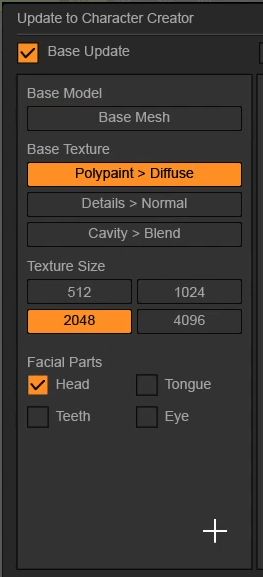
So far we have only worked on the base of our character, so we are going to deactivate the entire section corresponding to expressions… well, this is much simpler!
For now, we have only worked on the base, so it is the only button that we are going to keep active and within the base we have modified the head, tongue, teeth and eyes, so we activate them as well.
GENERATE NORMAL MAP
With this configuration, what we are going to send to Character Creator is the information corresponding to subdivision level 1, but as we have sculpted using higher levels to achieve the final result, we are also going to activate “Details>Normal”: this will generate the normal Map we mentioned before, this way we will have all the details in our model and we can also adjust its intensity in Character Creator. We will not activate “Cavity>Blend” since it would generate a cavity map that is not necessary in our case but works great for realistic models.
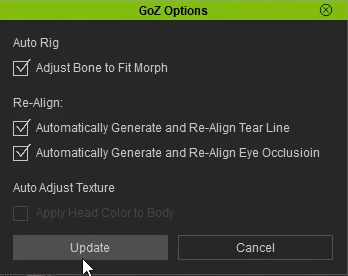

ZBrush begins to send all the information to Character Creator and when finished we can return to CC, where, once again, we do not have to worry about anything; We press “Update” and the automatic process continues.
Here we can see the original base mesh and the modified model in ZBrush.
SEND HAIR, EYEBROWS, MUSTACHE


Now we are also going to send the hair, eyebrows and mustache. To do this we just have to hide all the subtools by clicking on the little eye icon and press “Visible” to send them to Character Creator.
In Character Creator, we configure these parts as Accessories and click Update. Maybe we need to make some adjustments to the position.
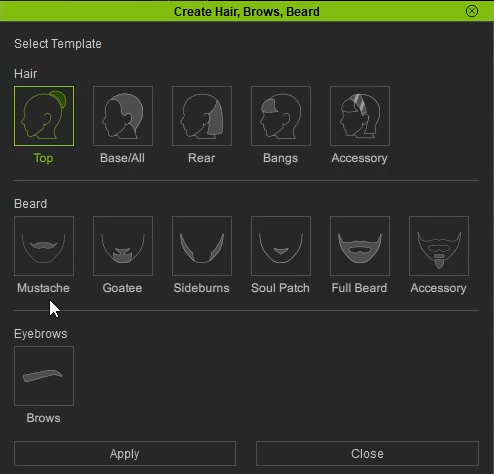
In order for each of these accessories to become a real part of our character’s face, we just have to go to the attributes panel, click Create Hair, Eyebrows, Beard and select the type of behavior for each of them.

Once configured, in the facial editor, we can verify that each of them already behaves as we would expect.
If we want to modify this behavior we can go to “Assign Conformable Regions” in the case of hair or “Facial Hair Vertex Assignment” in the case of mustache and define the vertices that will influence each of these elements and thus have absolute control of the deformation of both when modifying the expressions.
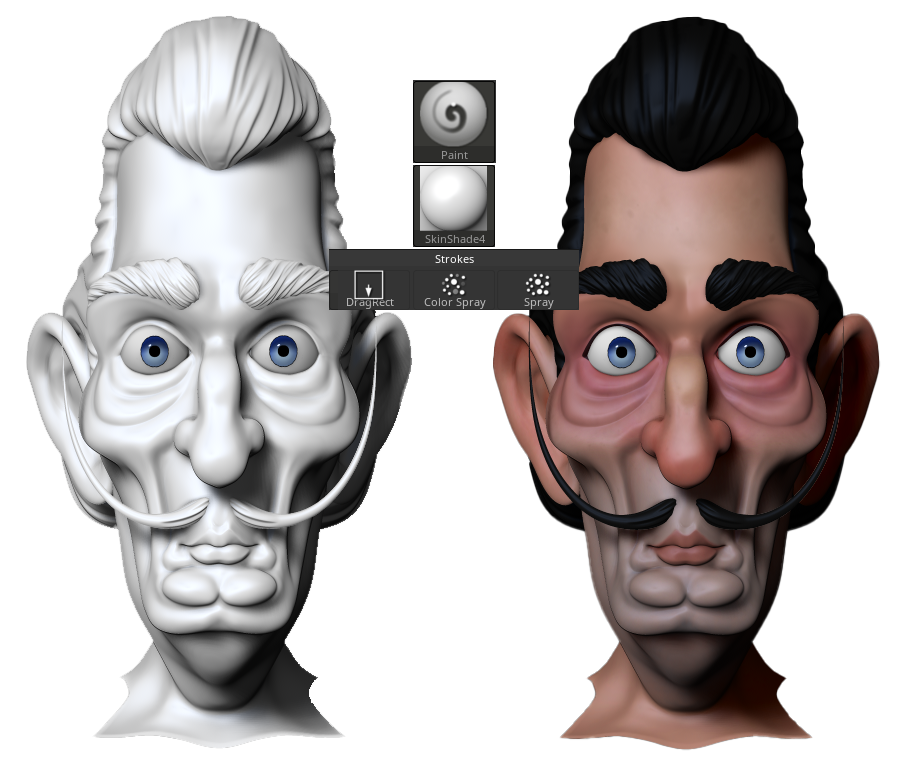
TEXTURING SKIN WITH POLYPAINT
We continue with the customization of our character, in this case we are going to texture the skin using Polypaint. We are simply going to apply the colors on the SkinShade material progressively until we get the appearance we want and finally we send it back to Character Creator using “Update to Character Creator”
Once again, logic will guide our decisions, so if we have only changed the Polypaint.
We will only select “Polypaint>Diffuse” in the Base Texture options and since we have only changed the Polypaint of the head, we will only select “head” in the Base Texture options to send to Character Creator.
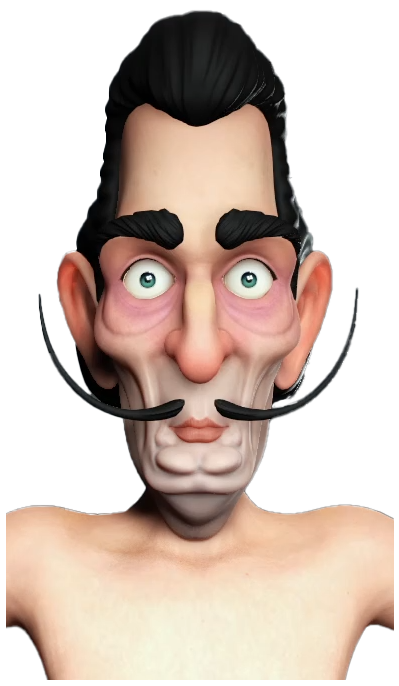
By sending the color information to Character Creator, it gives us the option of also applying those values to the body so, despite having painted only the face, the coherence between one and the other is perfect. After adjusting the scene’s lighting parameters a bit, everything now looks perfect so it’s time to go back to ZBrush and start the really important part of this workflow.

ADJUSTING EXPRESSIONS IN CHARACTER CREATOR
Actually, what FACE TOOLS does automatically is create a series of layers that will produce different deformations in the mesh to generate the expressions. The goal is that we can create personalized wrinkles for each of our characters in an individual and creative way and thus provide them with a unique personality.
In the expressions section of the plugin we see that we have 13 base expressions that we can work on. Subsequently, these expressions will be combined in Character Creator and gradually merged creating infinite results as we will see later.
At the beginning, we have loaded the “Neutral Wrinkles” pack in our model, so when you press each of the buttons, in addition to the deformation of the mesh corresponding to each expression, certain wrinkles also appear that already add personality to our model. We can use these wrinkles as a guide or smooth the mesh at each of the subdivision levels so that they disappear completely and do our work from scratch. To have a reference of how the eyebrows are going to behave, I am going to paint them directly on the skin.
I’ll start with the “Eyebrow Raise” expression. As we already saw when creating the base of our character, it is best to work on the lowest subdivision level while looking for the shapes and increasing to define details, although always trying to follow the direction of the topology when generating the wrinkles.
UPDATE TO CHARACTER CREATOR
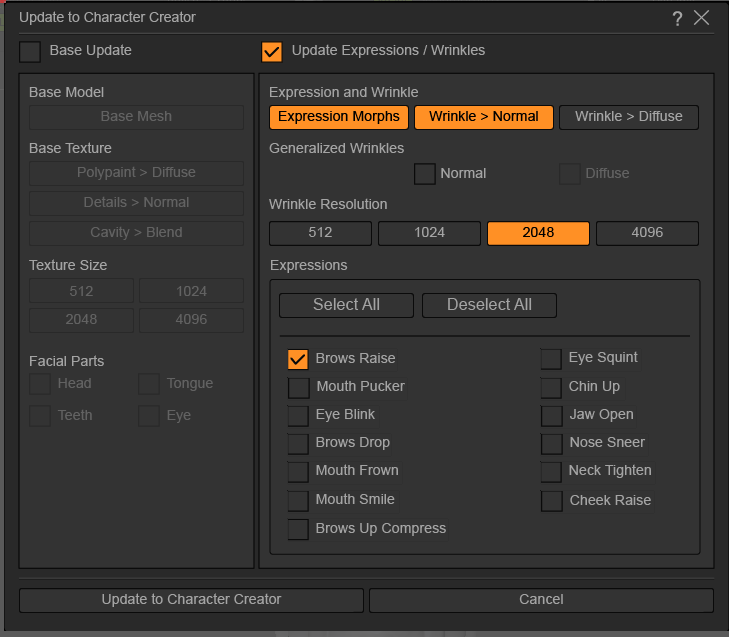
In the “Update to Character Creator” window we will only mark the update of the expressions/wrinkles, and activate the buttons to generate the corresponding morph and the normal map for the wrinkles.
Since we are going to generate our own custom wrinkles by Sculpting in ZBrush, we will deactivate the “Normal” box since this option is focused on controlling the generic wrinkle packs.
We could make all the wrinkles and finally export again to Character Creator but in my case I am going to do it one by one and we will see the difference. Every time I update, I will select the corresponding wrinkle.
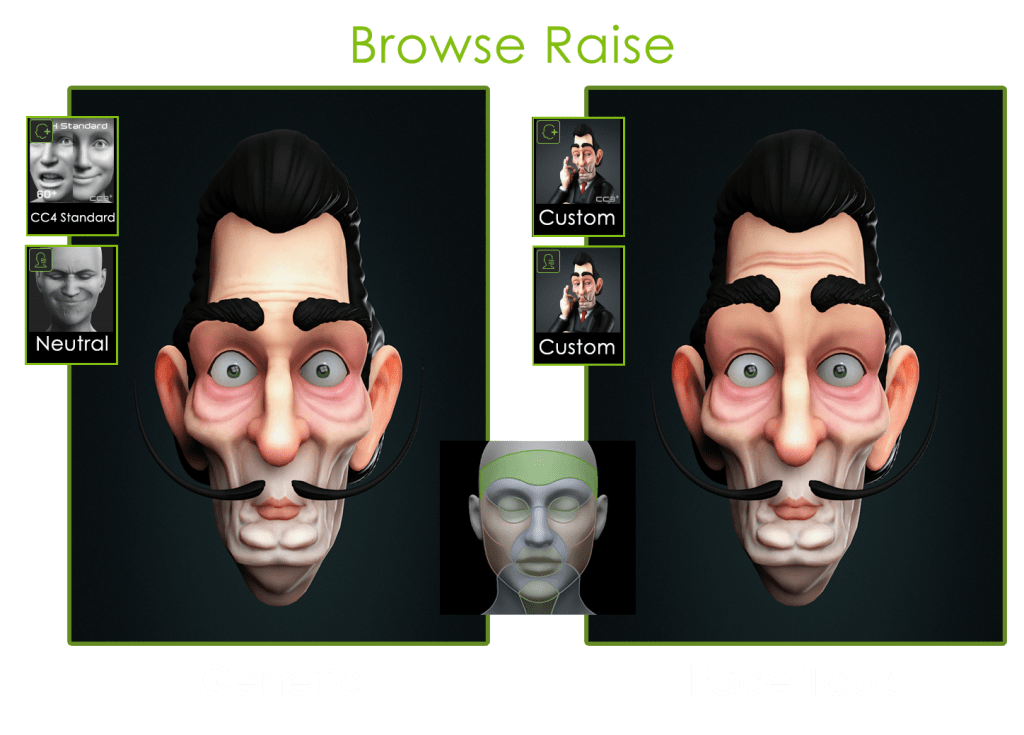
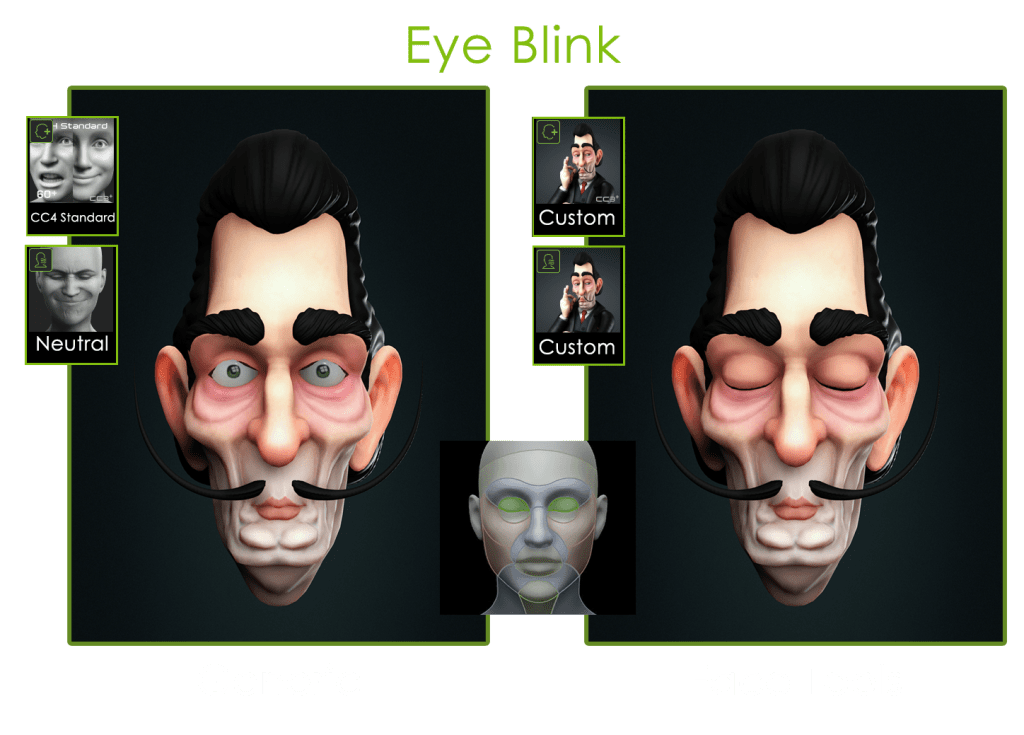
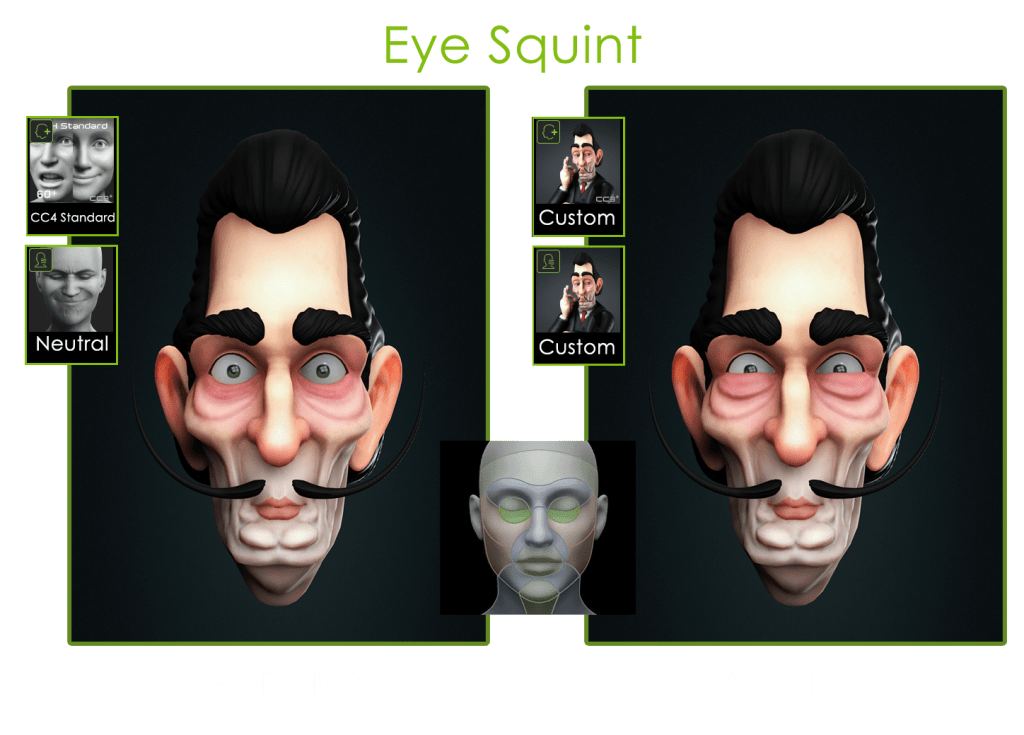
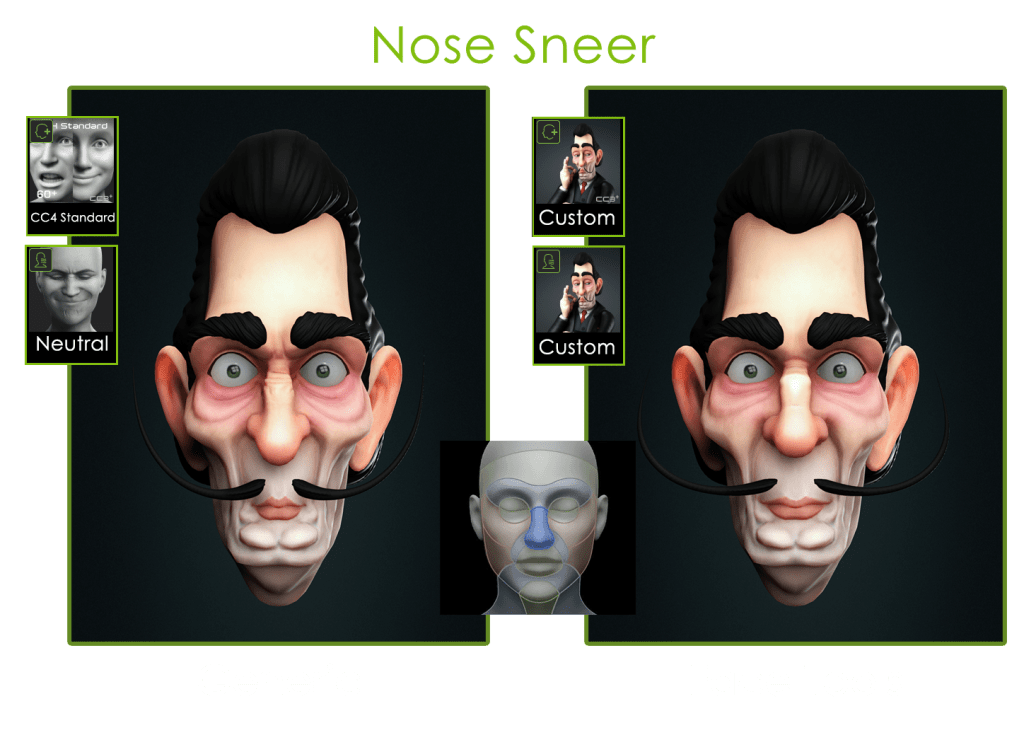
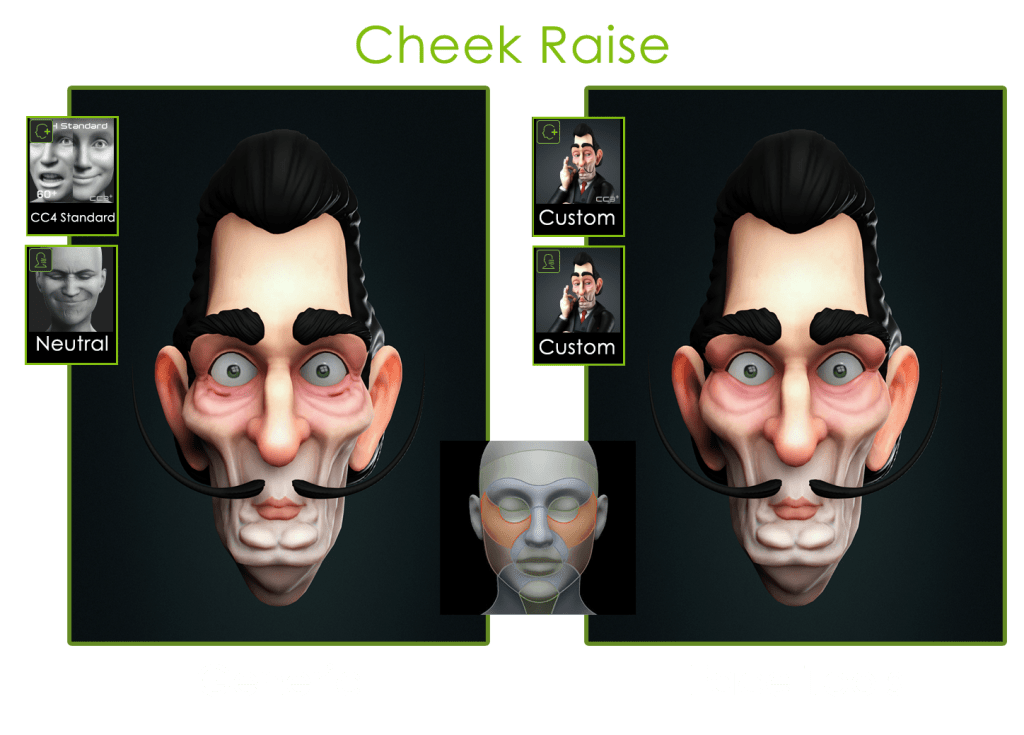
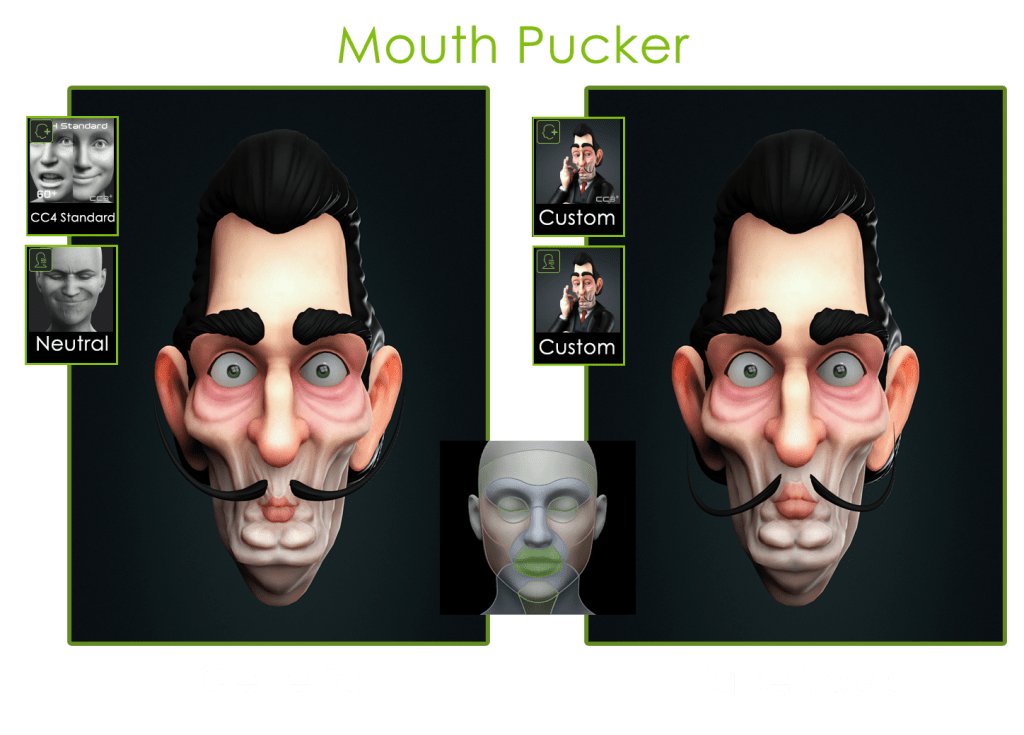
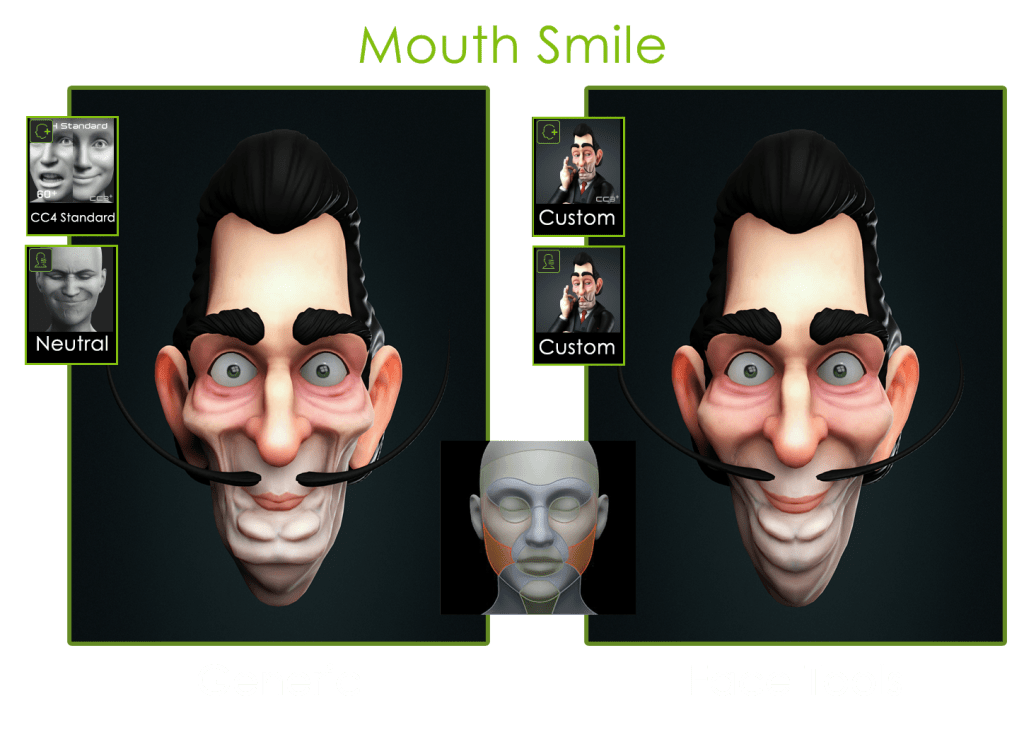
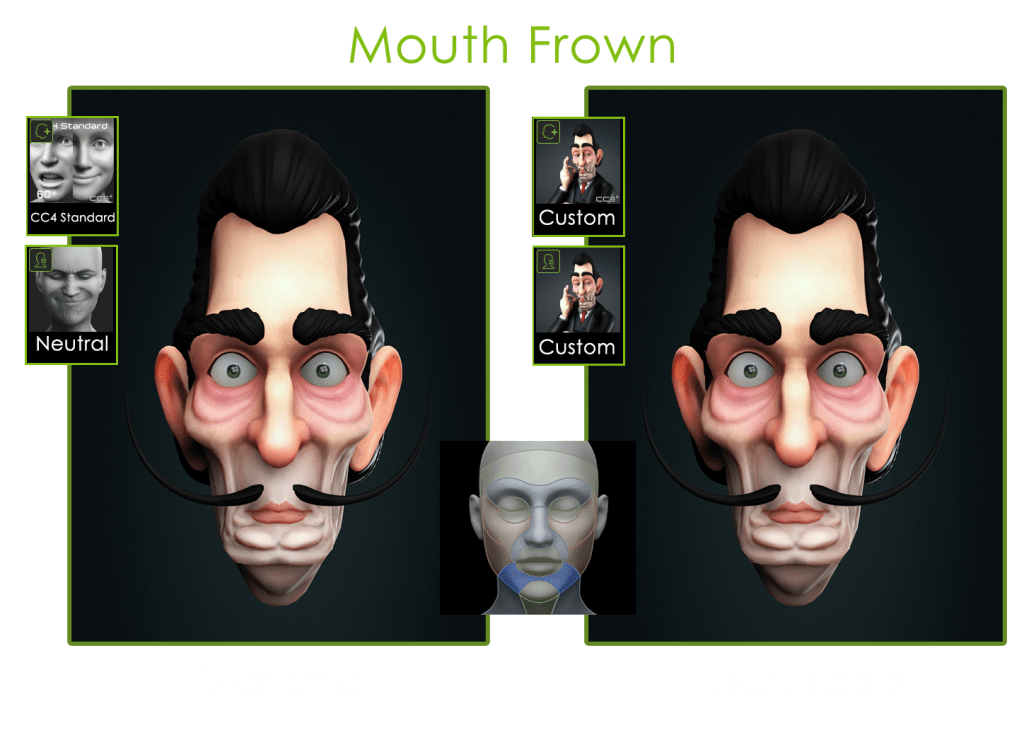
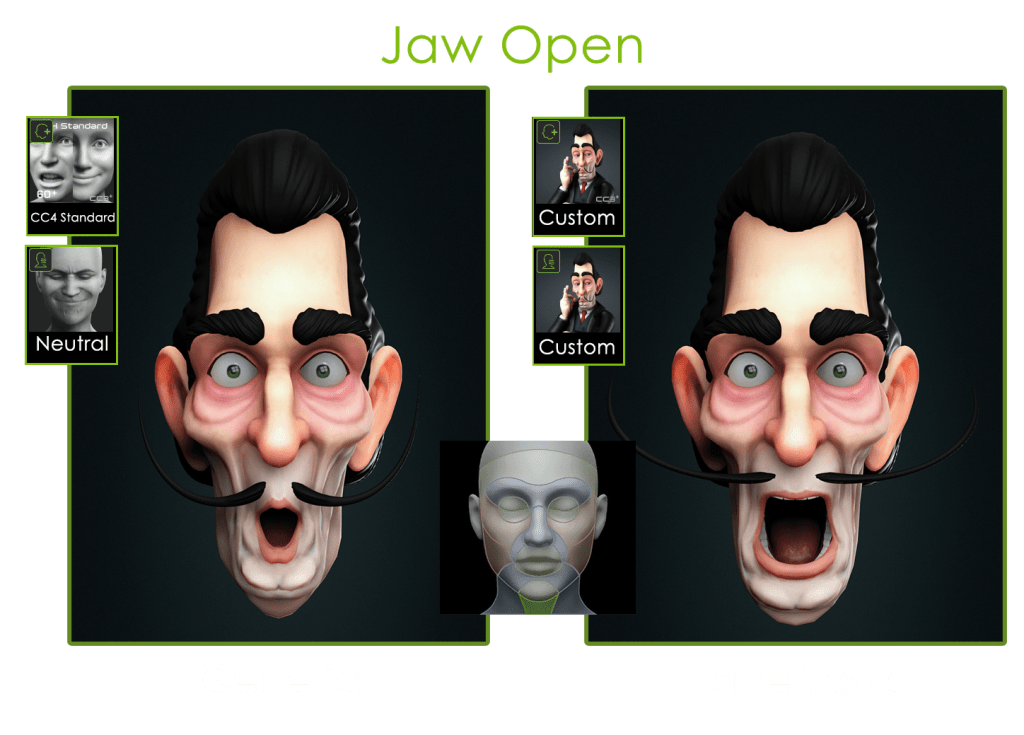
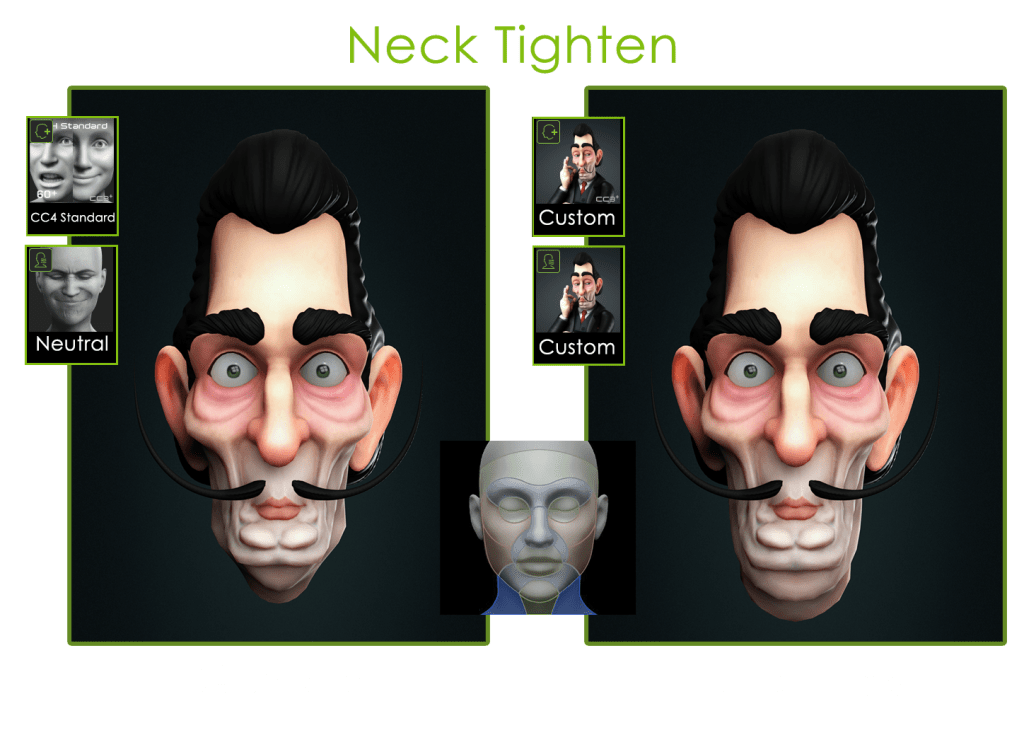
13 BASE EXPRESSIONS
Here we can see the ZBrush expressions version after having modeled the wrinkles. In addition to sculpting the expressions, we can also apply a different Polypaint to each of them to highlight areas or apply some type of color variation.

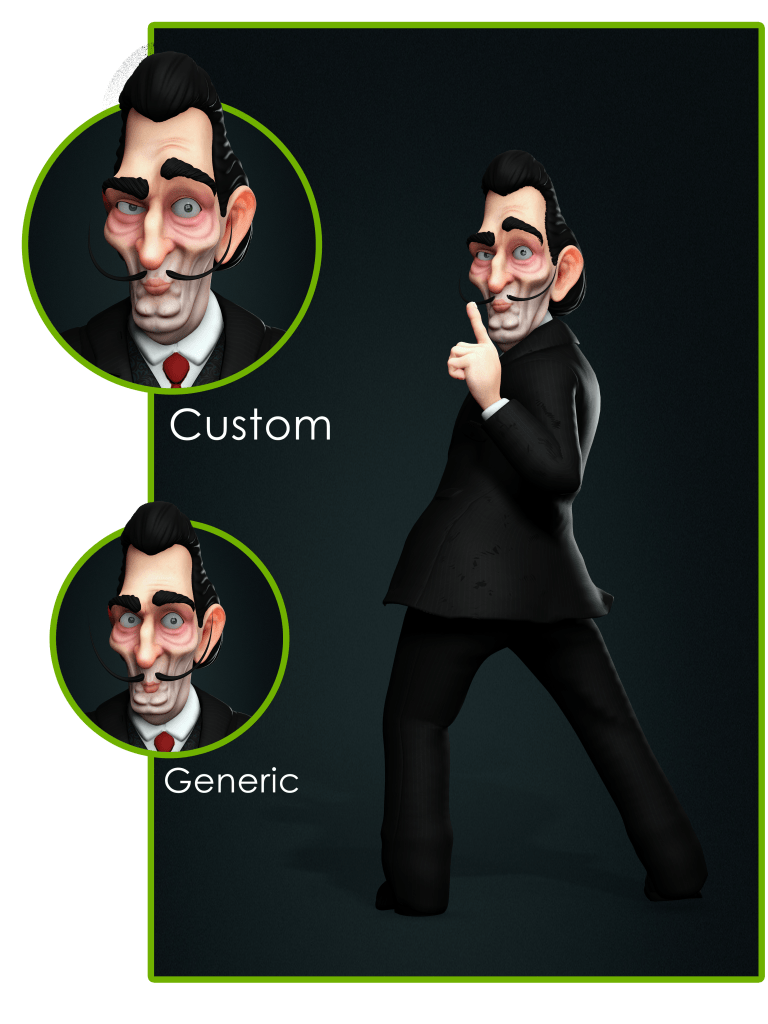
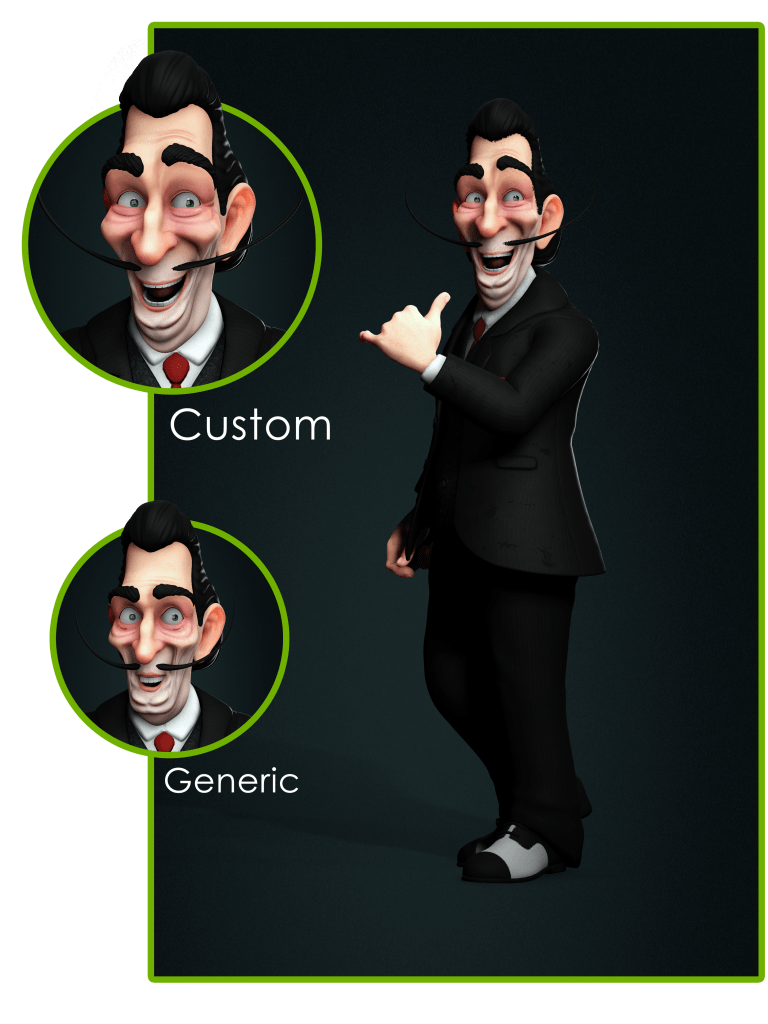
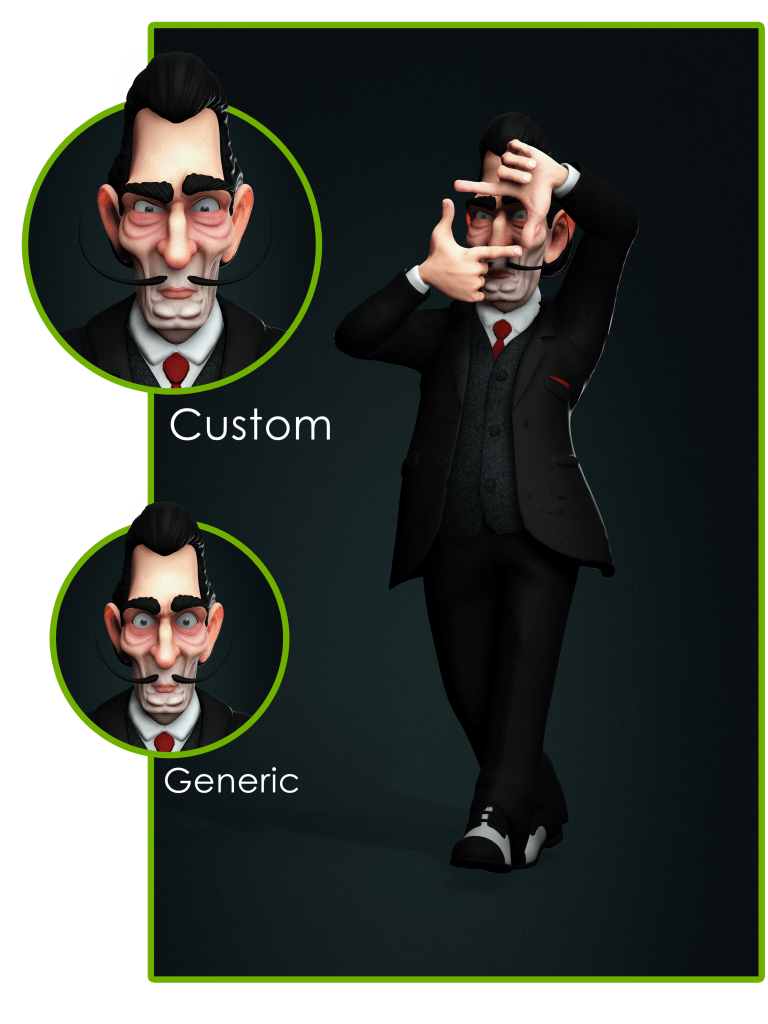
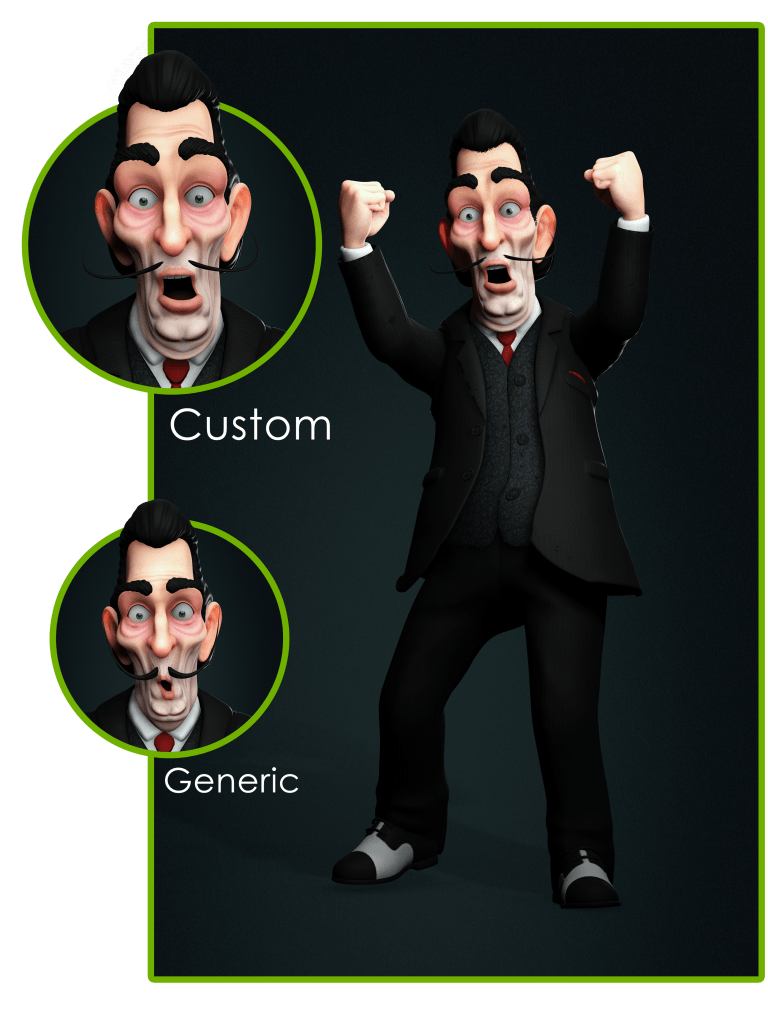
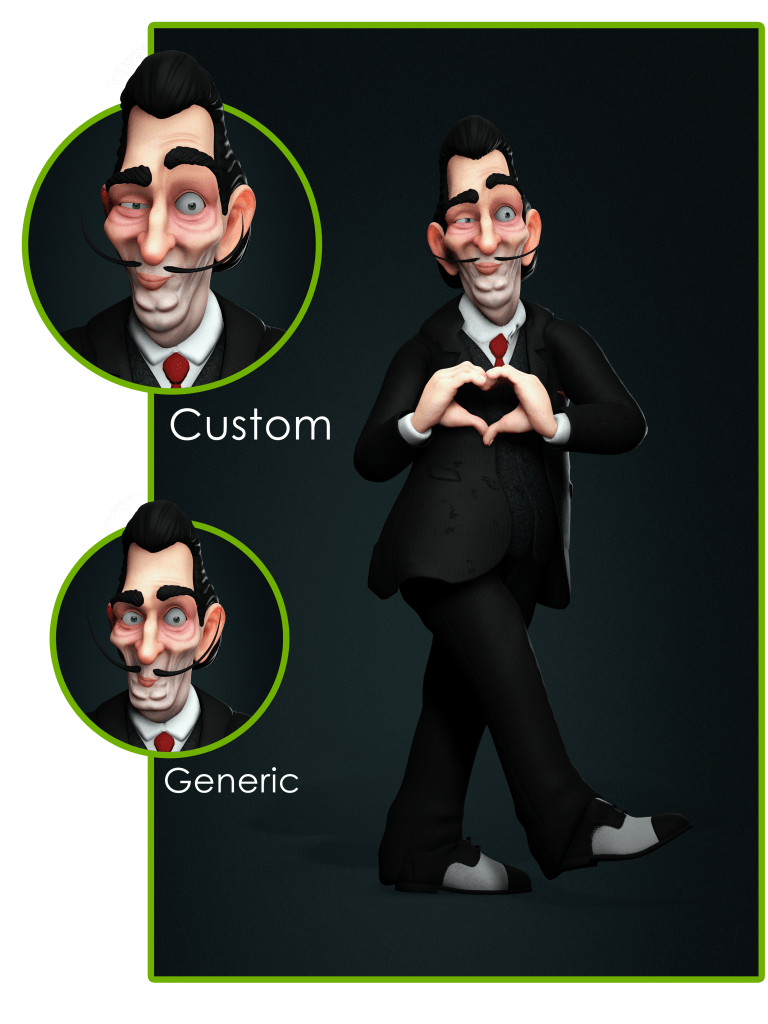
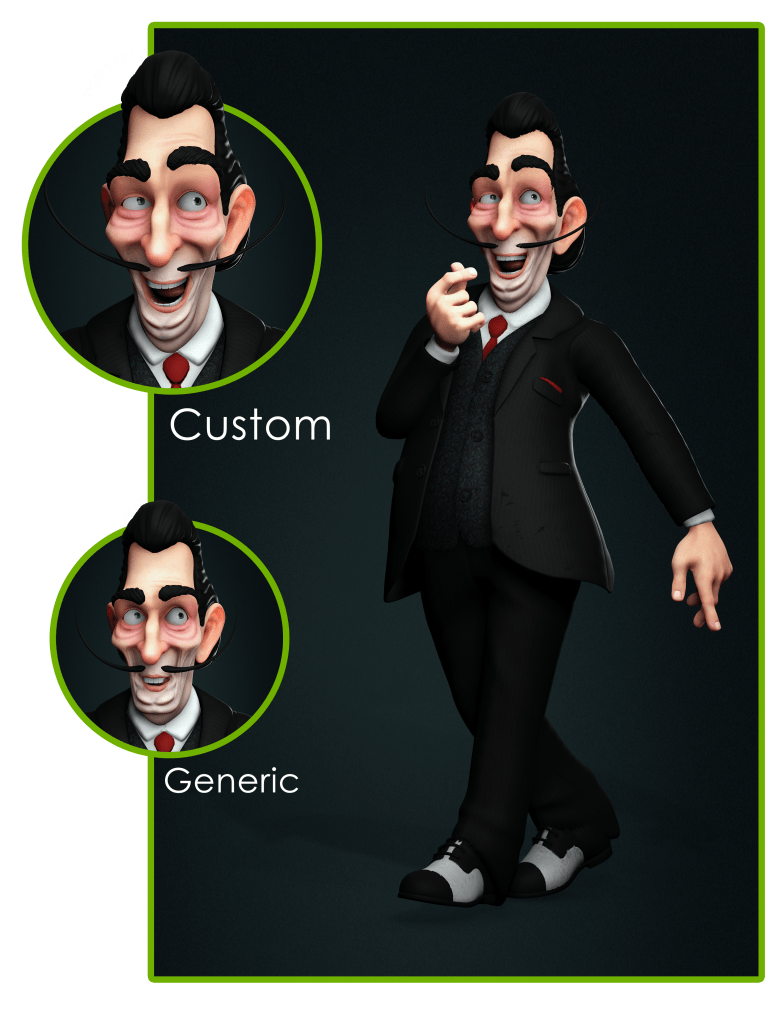
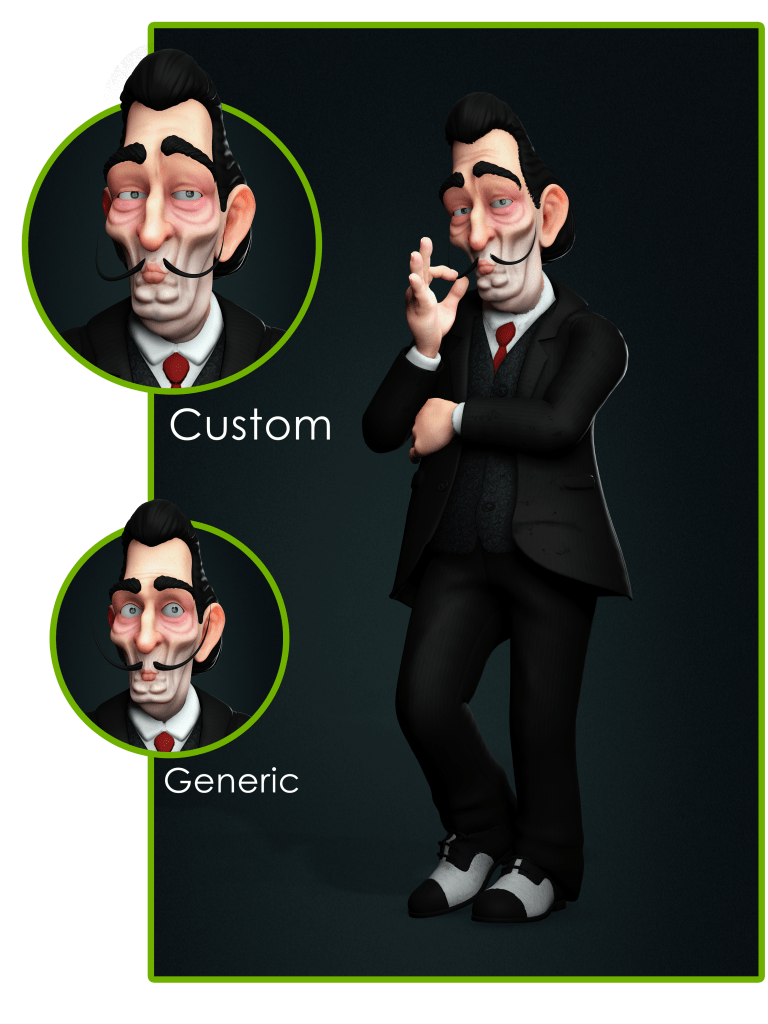
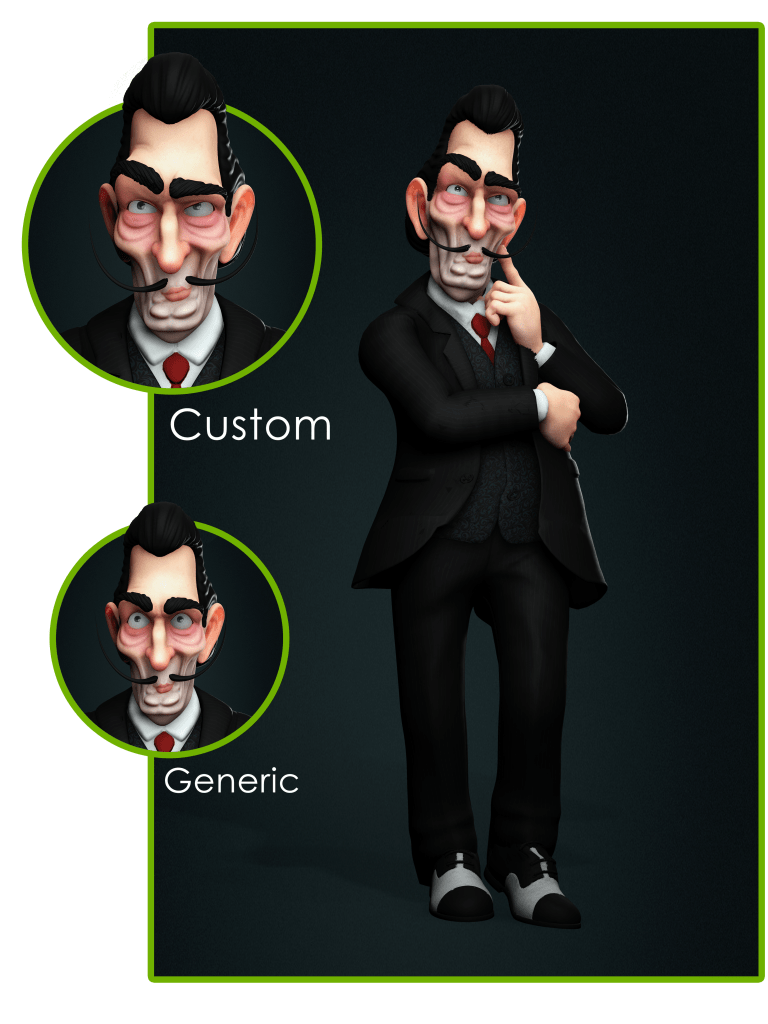
Those 13 expressions that we modeled in ZBrush correspond to the 13 regions of influence that we see in the CC Wrinkles Panel, so now we are going to see the difference between the generic version and the customized version based precisely on those 13 regions.


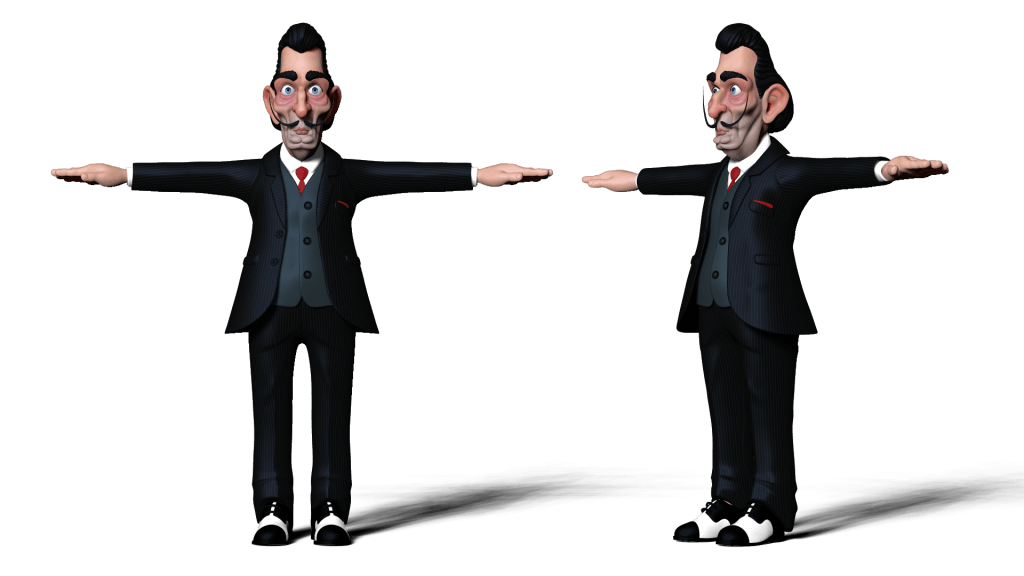
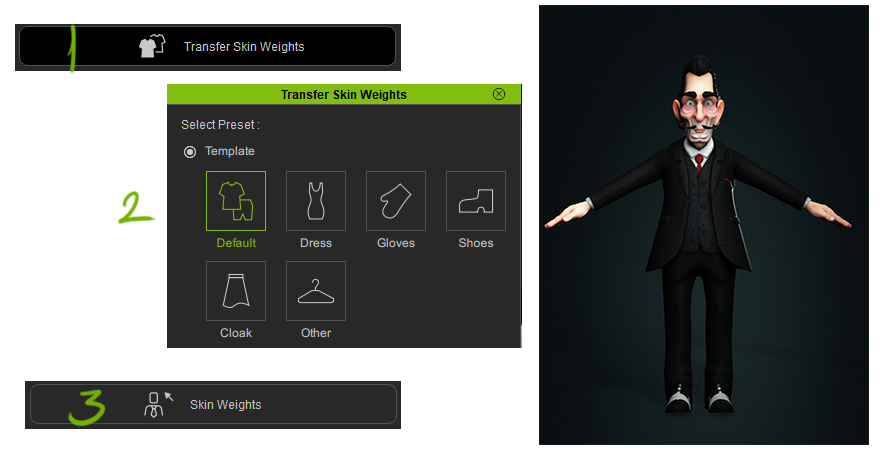
COMPLETING CHARACTER AND CLOTHING
I couldn’t resist doing the full character, since if we combine facial expressions with body language, we will gain a lot of expressiveness.
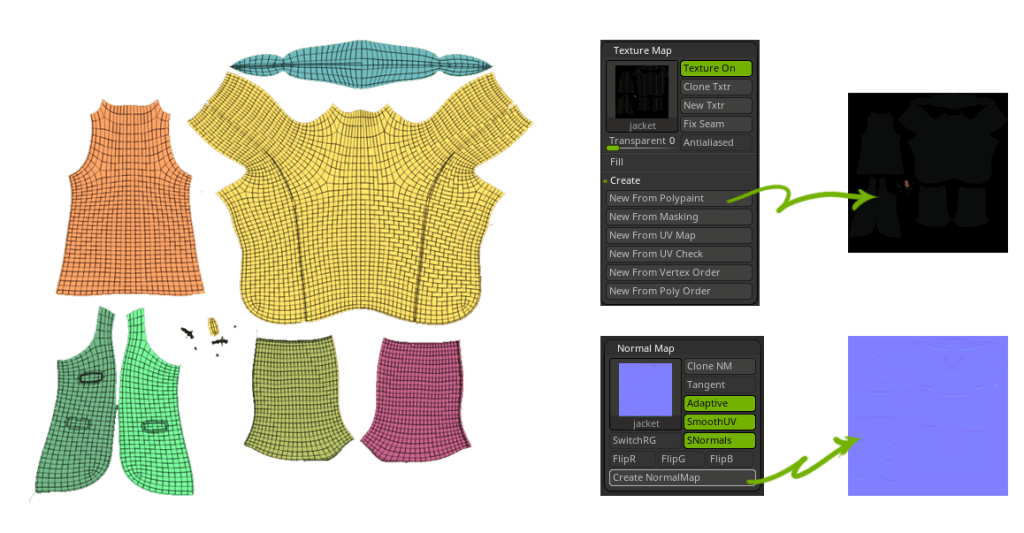
I created the garments in ZBrush quickly, creating the UV’s and painting or texturing directly in this software.
By having the UV’s we only have to generate normal and diffuse maps so that it is applied directly in CC and we see it textured.
By pressing “Visible” button we will send it to Character Creator.
Once in CC, only select the garment, press the transfer weights button, choose the corresponding template and make any subsequent adjustments to the weights if necessary. Our Character is now complete!!
CREATING OUR CUSTOM EXPRESSIONS
As you have seen, everything we have done so far has been artistic processes since the entire technical part is completely automated by the tool… we have left behind all the repetitive, boring actions that are far from the creative process.
The next thing will be even more fun, we are going to create unique expressions for our character.
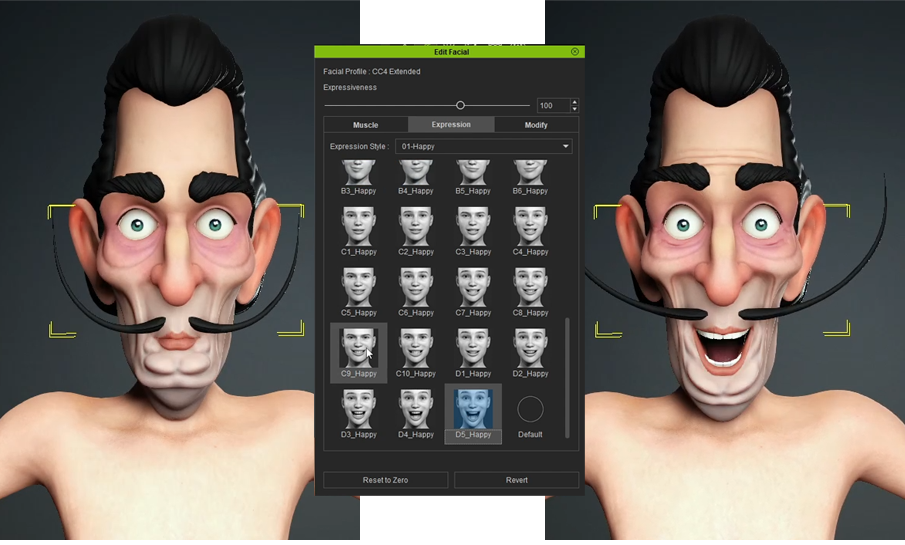
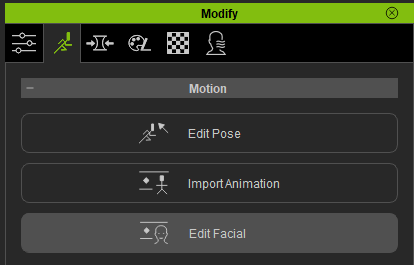
We go to “Edit Facial” within the “Motion Pose” panel and we can start defining our expressions.
When creating expressions we have 3 options:
The first option is “Muscles”, a super intuitive editor in which we will select a region and just move the mouse in the desired direction for it to deform. In this editor, in addition to modifying the regions of the face, we can be even more precise by accessing the eyes, mouth or tongue panel.

CHOOSING PREDEFINED EXPRESSIONS
The second method would consist of choosing one of the predefined expressions from the “Expressions” option. The list is huge and we would have our expression in just one click.
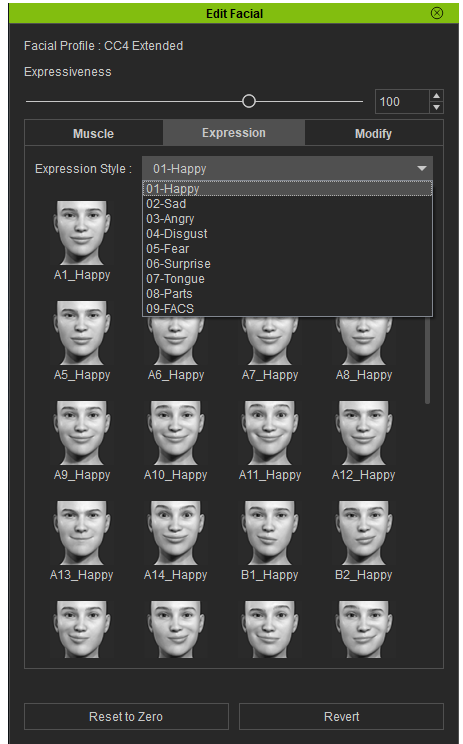
The expressions are divided into 6 categories and some extra that Character Creator provides us:
- Happiness
- Sadness
- Anger
- Disgust
- Fear
- Surprise
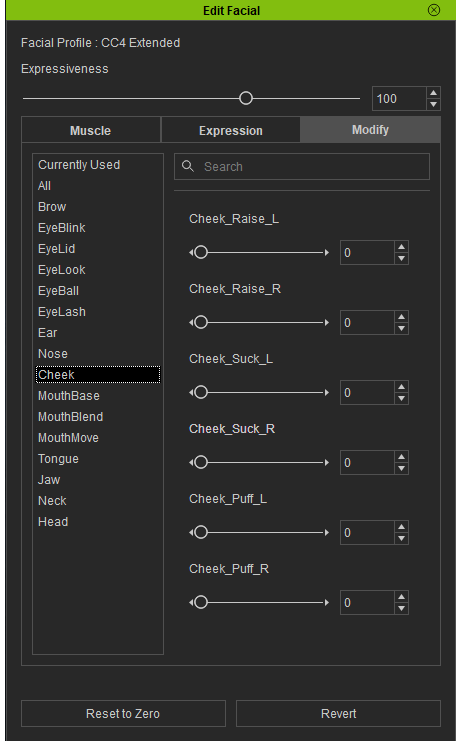
Finally, we will have the option to modify each region using sliders with total precision.
The best of all is we can combine these 3 systems to create our expression.
For example, we can start with a predefined expression. Then select and modify the position of a muscle group and finally make some fine adjustments using the sliders.
Below, I show you the expressions I created along with the body pose.


MY CONCLUSIONS
I think that throughout this year Reallusion has clearly been on the side of the artists. They are giving us tools so that creative people can invest their time in. Allowing us to create and not waste effort in technical, boring and repetitive processes.
When it comes to posing characters, the introduction of the Character Creator Pose Tools seems like a real revolution. As we can create them completely from scratch and take them to Character Creator. To make dynamic poses in a super natural, intuitive and even fun way.
Now, with the introduction of CC Face Tools, it is true that we depend on a base mesh. But they have a perfect topology, and we can push it to the limit and it still performs great.
We can give each of our characters a unique personality through the 13 customizable expressions in ZBrush. And then take advantage of the power of CC’s expression tools to have absolute precision in facial gestures.
In addition to increasing productivity. I think I could summarize the use of these tools as something that we were all looking forward to!
WE’RE GOING TO ENJOY!
—————————————
Follow Óscar Fernández:
ArtStation:
https://www.artstation.com/oscargrafias
YouTube:
https://www.youtube.com/@Oscargrafias/videos
Instagram:
https://www.instagram.com/oscarfernandez_3dart/
Facebook:
https://www.facebook.com/oscargrafias/
————————————————————————————————————————————————————————————
This article is also featured on CG Ghannel.


1 comment
Bravo and well done. Dhali is one of my favorite artist. Amazing work and thanks for the tutorial too. Would be great to make a series of the old painters and see what they think of the new pop art.