![]()
This blog post gives a walkthrough of the Step-By-Step Activity Guides of the Google Professional Cloud Architect Certification Training program that you must perform to learn this course.
The walkthrough of the 100 Step-By-Step Activity Guides of the Professional Google Cloud Architect Training program will prepare you thoroughly for this certification and clear your concepts.
To get started with your Google Cloud Architect journey, let’s look at these hands-on guides in detail.
Lab 1: Register for Google Cloud free trial account
In this lab, you’ll learn how to sign up for a free trial account on Google Cloud, which gives you access to several cloud services. You’ll register for a Google account, provide payment details (there are no costs for the trial period), and get access to the Google Cloud Console for testing and education.
Lab 2: Accessing cloud console
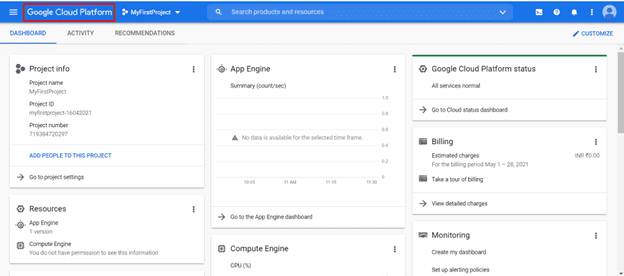
The Google Cloud Console is the main interface for controlling your cloud services, and in this lab, you will learn how to use it. Use your web browser to go to the console, log in using your Google account, and then take a look around the dashboard and the available options. You’ll become accustomed to the UI through this practical experience, making future cloud administration duties easier for you.
 Lab 3: Accessing Cloud shell
 Lab 3: Accessing Cloud shell
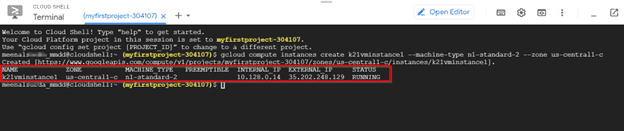
In this lab, You will learn how to use Google Cloud Shell, a command-line interface that allows you to manage Google Cloud Platform resources right from your web browser, in this lab. Using the Google Cloud Console, you will navigate to the Cloud Shell, where you may run scripts and commands, access files, and easily interact with your cloud environment. You will get the ability to effectively administer your cloud infrastructure with command-line tools after this practical training.
 Lab 4: Resource hierarchy
 Lab 4: Resource hierarchy
This lab will introduce you to Google Cloud Platform’s (GCP) resource hierarchy concept. You will gain knowledge about the hierarchical structure of resource organization, which begins at the Organisation level and moves down to Projects, Folders, and Resources. Comprehending this hierarchy is essential for efficient resource management, governance, and access control in GCP environments.
 Lab 5: Enabling API in projects

You will be able to enable APIs (Application Programming Interfaces) in Google Cloud Platform (GCP) projects during this lab. To activate an API for your project, navigate to the API Library in the Google Cloud Console, choose the required API, and save it. You can programmatically access and use a variety of Google Cloud services and functions by enabling APIs.
Lab 6: Creating IAM policies and permissions(Granting Roles for principals)
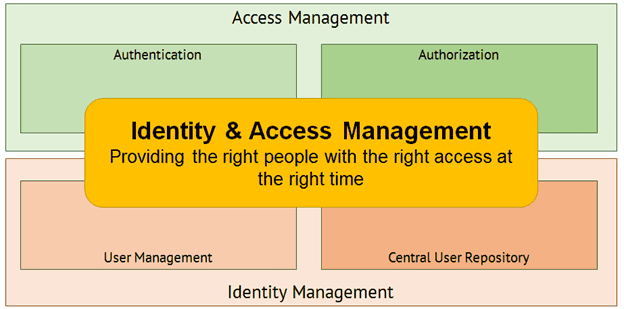
In this lab, You will explore Google Cloud Platform’s Identity and Access Management (IAM) in this lab (GCP). You’ll discover how to establish IAM policies that govern access by assigning principals—users or groups—certain roles. You can specify granular permissions with role-based access control, which guarantees safe and effective resource management for your GCP projects.
 Lab 7: Managing various role types and defining custom IAM roles
 Lab 7: Managing various role types and defining custom IAM roles
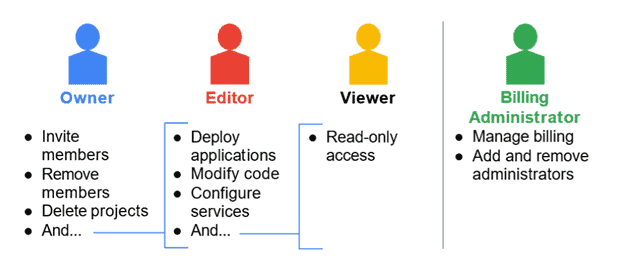
In this lab, you will investigate the various role types that are accessible under the Identity and Access Management (IAM) of Google Cloud Platform (GCP). To satisfy certain access control needs, you will learn how to create new IAM roles and manage predefined roles that are designed for particular functions. Gaining knowledge about role types and customization enables you to adjust permissions precisely, improving security and governance in GCP environments.
 Lab 8: Providing permissions to a group of principles
 Lab 8: Providing permissions to a group of principles
Throughout this lab, you will discover how to grant Google Cloud Platform (GCP) access to a group of principals. To grant access to resources, you will first construct a group and use IAM policies to assign it to the appropriate roles. Effective permission delegation and management throughout teams and departments within GCP projects is ensured by this procedure.
Lab 9: Get to know about service accounts and their types
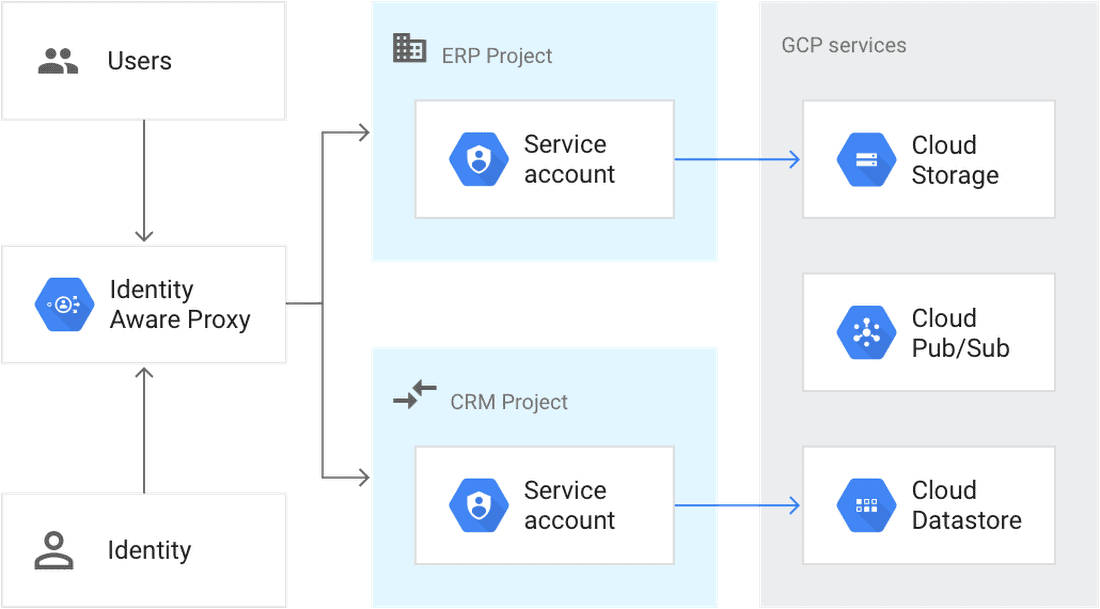
In this lab, You will explore Google Cloud Platform (GCP) service accounts. The several kinds of service accounts that are available, such as user-managed and Google-managed service accounts, will be covered. Comprehending service accounts is crucial for safely granting services and apps access to GCP resources on behalf of users or other apps.
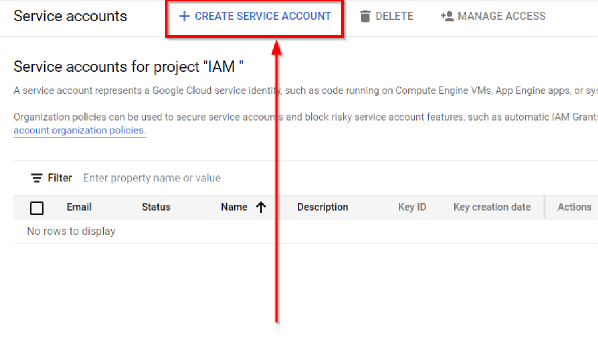
Lab 10: Creating a Service Account
This lab will teach you how to create a Google Cloud Platform (GCP) service account. To create and configure a new service account, go to the Google Cloud Console’s IAM & Admin area and set its permissions. To enable automation, securely access GCP resources, and facilitate communication between applications and services, service accounts are necessary.
 Lab 11: Managing service accounts and keys
 Lab 11: Managing service accounts and keys
This lab will teach you how to use Google Cloud Platform (GCP) to manage service accounts and the keys that go with them. To see, create, and delete service accounts and their keys, click on the Google Cloud Console’s IAM & Admin section. To guarantee safe access to GCP resources and uphold reliable identity and access control procedures, service accounts and keys must be managed appropriately.
Lab 12: Assigning service accounts to resources
In this lab, You will investigate the procedure for allocating service accounts to resources within the Google Cloud Platform (GCP) in this laboratory. You will open the Google Cloud Console, navigate to the IAM & Admin section, choose the resource you want, and provide the related service account with the necessary permits. Through this procedure, secure communication between services and resources in your GCP environment is facilitated and fine-grained access control is enabled.
Lab 13: Using service account in IAM policies with minimum permissions
In this lab, you will set up service accounts in Google Cloud Platform (GCP) Identity and Access Management (IAM) rules with restricted rights. A custom IAM role with restricted permissions will be created, and assigned to a service account, and its functionality tested. This technique limits service accounts to only the tasks required within your GCP projects, increasing security and ensuring the least privileged access.
Lab 14: Launch the compute engine using the console
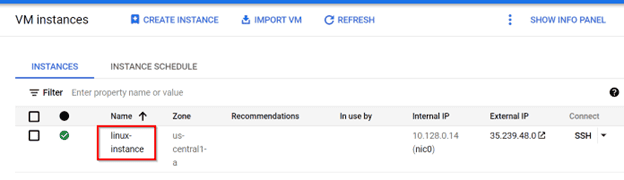
In this lab, You will learn how to use the Google Cloud Console to start a Compute Engine instance in this experiment. Proceed to the Compute Engine area, establish a fresh virtual machine instance, and adjust its configuration parameters. Through this practical exercise, you will become acquainted with the procedure for setting up virtual machines on the Google Cloud Platform for a range of computing requirements.
 Lab 15: Assigning boot disks, Availability policies, SSH keys
 Lab 15: Assigning boot disks, Availability policies, SSH keys
This lab will cover setting SSH keys, boot discs, and availability policies for Google Cloud Platform (GCP) Compute Engine instances. For resilience, you can establish instance availability policies, manage SSH keys for secure remote access, and choose several boot disc types. Your virtual machines within GCP will operate at peak efficiency, dependability, and security if you are aware of these configurations.
Lab 16: Provision of static public IP address to a machine
In this lab, You will learn how to give a virtual machine on Google Cloud Platform (GCP) a static public IP address in this experiment. After selecting a static IP address, you will link it to your Compute Engine instance under the Networking section. By following this procedure, you can be guaranteed that outside users or services can consistently access your virtual machine and communicate with it.
Lab 17: Create a snapshot and detailed overview
In this lab, You will create a disc snapshot on the Google Cloud Platform (GCP) during this lab. To create a snapshot, visit the Compute Engine section, choose the disc you wish to snapshot, and click Create. Snapshots function as backups by preserving the disk’s state at a particular moment in time and offering data security and disaster recovery features within GCP.
Lab 18: Create an image and detailed overview
In this lab, You will learn how to generate a custom image from a virtual machine on the Google Cloud Platform (GCP) throughout this experiment. You’ll pick the virtual machine instance, go to the Compute Engine area, and start the image creation procedure. By capturing a virtual machine’s configuration and contents, custom images help you quickly deploy and maintain consistency throughout your GCP cloud architecture.
Lab 19: Create a machine image and detailed overview
In this lab, You will learn how to create a machine image in Google Cloud Platform (GCP) in this lab. You will go to the Compute Engine section, pick the virtual machine instance, and start the process of creating the machine image. Virtual machine environments may be deployed and scaled more effectively within GCP thanks to machine images, which offer a simplified method of capturing and replicating whole VM setups.
Lab 20: Install HTTP web server application
In this lab, you will set up a virtual machine in Google Cloud Platform (GCP) to run an HTTP web server application. After installing and configuring the web server software (such as Apache or Nginx) to serve web content, you will SSH into the Compute Engine instance. You may create and maintain websites or web apps on your GCP infrastructure with this practical exercise, which makes it easier to be visible and accessible online.
Lab 21: setting up the Startup script
In this lab, you will set up a virtual machine’s Google Cloud Platform (GCP) launch script. You will write a unique startup script that will run commands to install software and configure settings when the virtual machine boots up. By automating setup chores, this technique ensures that virtual machine instances inside your GCP environment are initialized consistently, expediting the deployment process.
Lab 22: Creating custom image
In this lab, You will learn how to use Google Cloud Platform (GCP) to produce a custom image in Lab 22. The first step is to set up a virtual machine instance according to your requirements. The disc state of the instance will then be captured and saved as a custom image using the Compute Engine part of the GCP Console, making it simple to replicate and distribute consistent environments.
Lab 23: Attaching GPU to a new instance and installing necessary dependencies
In this lab, a new Google Cloud Platform (GCP) virtual machine instance will have a GPU attached to it. You will select the Compute Engine section, launch a fresh virtual machine instance, and set it up with a GPU accelerator. The next step is to install the required drivers and dependencies so that you may use the GPU for accelerated computing tasks like graphic rendering and machine learning.
Lab 24: Installing Cloud monitoring and logging agent
You will install the Cloud Monitoring and Logging agents on your virtual machine instances hosted by Google Cloud Platform (GCP) in this lab. You will navigate to the Compute Engine area, choose the instance, and launch the installation of both agents. These agents provide thorough monitoring, troubleshooting, and analysis of your GCP infrastructure by gathering and sending metrics, logs, and metadata to Cloud Monitoring and Logging.
Lab 25: Configuring cloud monitoring and logging agent for a VM instance
In this lab, you will set up agents for Cloud Monitoring and Logging on a Google Cloud Platform (GCP) virtual machine (VM) instance. Navigating to the Compute Engine area, choosing the preferred virtual machine, and turning on both agents will enable real-time system and application metrics logging and monitoring. This configuration facilitates proactive administration and troubleshooting within GCP by improving insight into the security, health, and performance of your virtual machine.
Lab 26: Create VM instance using instance template and detailed overview
Compute Engine is a computing and hosting service that allows users to create and run virtual machines on Google infrastructure.
In this lab, you will use an instance template to establish a virtual machine (VM) instance on Google Cloud Platform (GCP). The first step is to define the details of the virtual machine (VM) in the template, such as its boot disc, machine type, and network setup. Next, by using the template to deploy the virtual machine instance, you may expedite the provisioning of consistent environments and enable effective scalability within GCP.
 Lab 27: Creating a Managed instance group (MIG)by using an instance template
 Lab 27: Creating a Managed instance group (MIG)by using an instance template
In this lab, you will use an instance template to construct a Managed Instance Group (MIG) in Google Cloud Platform (GCP). Within the template, you will specify the boot disc, startup script, machine type, and other configuration and specification details for the virtual machine instances. You may guarantee high availability and dependability for your GCP applications by automating the administration and scaling of a collection of homogeneous instances by deploying an MIG based on the template.
Lab 28: Creating a Managed instance group (MIG)by using CLI
In this lab, you will use the command-line interface (CLI) to construct a Managed Instance Group (MIG) in the Google Cloud Platform (GCP). Commands are used to specify the MIG configuration, which includes the target size, zone, and instance template. This method makes homogenous instances scalable and automatable, which makes it easier to manage apps and services within GCP.
Lab 29: Updating the MIG
In this lab, you’ll learn how to update a Managed Instance Group (MIG) in Google Cloud Platform (GCP). You’ll use the CLI or the Google Cloud Console to modify various aspects of the MIG, such as instance templates, target sizes, or autoscaling settings. This practice ensures flexibility and adaptability of your infrastructure, allowing for seamless adjustments to meet changing workload demands within GCP.
Lab 30: Creating and managing unmanaged instance group
In this lab, you will use Google Cloud Platform (GCP) to construct and administer an Unmanaged Instance Group. By setting the group’s configuration and composition, you will manually add instances of already existing virtual machines. You may manage resources more effectively by adding or removing instances, balancing loads, and modifying group settings using the GCP Console or CLI.
Lab 31: Creating load balancer(LB)
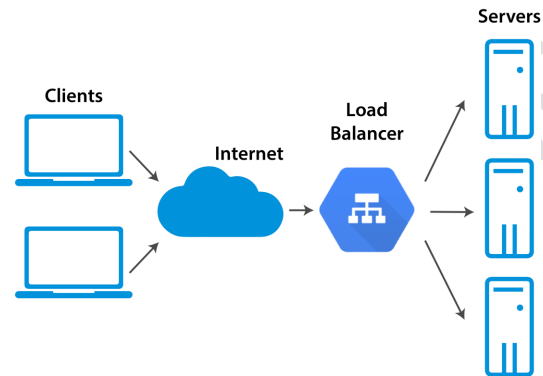
In this lab, You will set up a load balancer (LB) on the Google Cloud Platform (GCP) during this experiment to split up incoming traffic among several instances. To route traffic effectively, you will configure a backend service, provide health checks, and establish forwarding rules. You may improve the scalability, availability, and dependability of your services or apps by making use of GCP’s load-balancing capabilities.
lab 32: Exploring LB with web application
In this lab, you will use a web application that is hosted on Google Cloud Platform (GCP) to investigate load balancing (LB). To divide up incoming HTTP traffic among several virtual machine instances that are running the web application, you will set up a load balancer. You may learn more about how well the LB configuration distributes requests, enhances application speed, and maintains high availability in GCP by testing it.
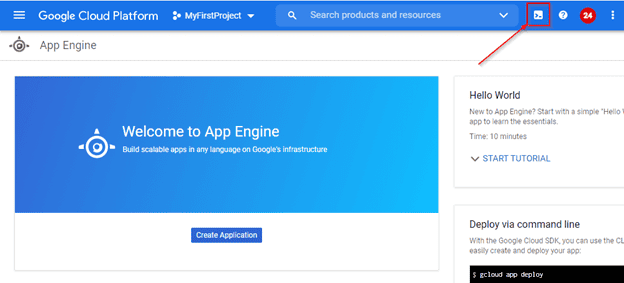
 Lab 33: Creating App Engine
 Lab 33: Creating App Engine
In this lab, you will use Google Cloud Platform (GCP) and Google App Engine to construct an application. After defining the runtime environment and scalability parameters for your application, you will deploy it to App Engine. You will become acquainted with the platform’s capabilities for creating and scaling web applications on GCP through this practical experience.
 Lab 34: Understanding the differences between Flexible and Standard
 Lab 34: Understanding the differences between Flexible and Standard
In this lab, Learn about the variations between the Standard and Flexible settings on Google App Engine. Each environment will be covered, along with its special features, scalability choices, and use cases. Knowing the differences between these environments will enable you to select the best environment within the Google Cloud Platform for your unique application needs and development preferences.
Lab 35: Deploying new Versions
In this lab, You will discover how to update your application on Google App Engine in this lab. The revised code and configuration for your application will be uploaded via the Google Cloud Console or the App Engine command-line interface (CLI). On Google Cloud Platform, deploying new versions guarantees your application’s continuous availability and dependability while facilitating upgrades and change testing.
Lab 36: Splitting Traffic between App Engine Versions
In this lab, You will divide traffic between various Google App Engine-deployed versions of your application during this study. To manage the distribution of incoming requests, you can set up traffic-splitting rules using the App Engine Console or the command-line interface (CLI). By facilitating canary deployments, A/B testing, and incremental rollouts, this technique helps to minimize risks and ensure seamless transitions during Google Cloud Platform application updates.
Lab 37: Create an App Engine environment
In this lab, you’ll create an App Engine environment on Google Cloud Platform (GCP) for deploying and running your applications. You’ll configure the runtime environment, scaling settings, and other parameters to suit your application’s requirements. By leveraging App Engine, you can easily deploy and manage web applications without worrying about infrastructure management, enabling rapid development and scalability in GCP.
Lab 38: Deploying application in app engine
You will deploy your application to Google App Engine in this lab. Google App Engine is a fully managed platform for developing and launching web apps. The code and configuration for your application will be uploaded via the Google Cloud Console or the App Engine command-line interface (CLI). You may achieve smooth scalability, automatic load balancing, and simple maintenance of your web application in the Google Cloud Platform by deploying it on App Engine.
Lab 39: Installing and configuring the command line interface (CLI) for Kubernetes (kubectl)
In this lab, you will learn how to install and set up the kubectl command-line interface, which is used to manage Kubernetes clusters. The kubectl binary will be downloaded, installed, and configured on your local computer so that it can communicate with your Kubernetes cluster. This configuration makes it possible for you to efficiently manage configurations, scale resources, and deploy applications from the command line.
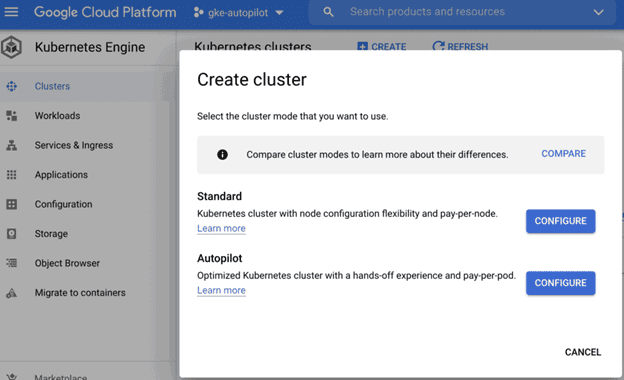
Lab 40: Deploying a Google Kubernetes Engine cluster with different configurations including regional clusters.
In this lab, You will set up a Google Kubernetes Engine (GKE) cluster with different configurations, such as regional clusters. Zone or region, node pool configurations, cluster version, and other parameters can be set using the Google Cloud Console or the command-line interface (CLI). Through this practical exercise, you will become acquainted with configuring GKE clusters to meet particular needs and improve performance, scalability, and resilience on the Google Cloud Platform.
Lab 41: Deploying a Google Kubernetes Engine cluster with different configurations including private clusters.
You will install a Google Kubernetes Engine (GKE) cluster in this lab with several settings, including private clusters. To set up security rules, networking, and access control, you’ll need to utilize the Google Cloud Console, often known as the CLI. With the help of this exercise, you will learn how to set up safe, segregated Kubernetes clusters on the Google Cloud Platform, which will improve your apps’ data security and privacy.
 Lab 42: Deploying a containerized application to Google Kubernetes Engine using pods
 Lab 42: Deploying a containerized application to Google Kubernetes Engine using pods
This lab will teach you how to use pods to deploy a containerized application to Google Kubernetes Engine (GKE). After defining the pod specs, you will deploy the resources and container images to the GKE cluster. This practical example shows how to use GCP’s infrastructure for scalability and reliability to manage and orchestrate containerized applications within Kubernetes.
Lab 43: Deploy a simple web server containerized application to a GKE cluster
You will install a basic web server application container on a Google Kubernetes Engine (GKE) cluster during this study. Using Docker, you will containerize the web server application, provide the Kubernetes deployment and service specifications, and then launch them onto the GKE cluster. Using the Kubernetes environment on the Google Cloud Platform, this practical experience demonstrates how to deploy and manage containerized apps in a scalable and dependable way.
Lab 44: Configuring Google Kubernetes Engine monitoring and logging
In this lab, you will set up a Google Kubernetes Engine (GKE) cluster’s logging and monitoring. You may activate logging and monitoring tools and create alerts for resource utilization and cluster health using the Google Cloud Console, also known as the CLI. Through proactive monitoring, troubleshooting, and optimization within the Google Cloud Platform, this technique guarantees visibility into the performance of your GKE cluster.
Lab 45: Viewing current running cluster inventory (nodes, pods, services)
In this lab, you will be able to see the nodes, pods, and services that are currently running in a Google Kubernetes Engine (GKE) cluster. You may get details about the resources in the cluster and their status by using the kubectl command-line tool. This exercise helps you learn the structure and functionality of the cluster within the Google Cloud Platform by giving you an inside look at its infrastructure.
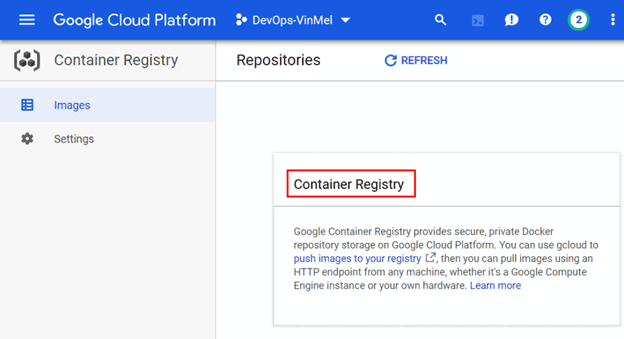
Lab 46: Browsing Docker images and viewing their details in the Artifact Registry
In this lab, you will explore Docker images and examine the information they include in Google Cloud Platform’s Artefact Registry (GCP). You can examine the available Docker images kept in your registry by going to the Artefact Registry area of the Google Cloud Console. Version control and software artifact deployment in GCP is facilitated by this practice, which gives you the ability to manage and inspect container images.
 Lab 47: Add node pool, pods, and services
 Lab 47: Add node pool, pods, and services
In Google Kubernetes Engine (GKE), you will add a node pool, pods, and services to a Kubernetes cluster during this experiment. You can deploy pods containing containerized apps, provide services for accessing those applications, and establish specifications for the node pool using the Google Cloud Console or the command-line interface (CLI). To improve the scalability and functionality of your Google Cloud Platform applications, this exercise shows you how to grow and manage the resources inside a Kubernetes cluster.
Lab 48: Edit node pool, pods, and services
You will edit node pools, pods, and services on Google Kubernetes Engine (GKE) within a Kubernetes cluster during this experiment. Configurations including resource allocations, labels, and selectors can be changed with the kubectl command-line tool or the Google Cloud Console. Using Google Cloud Platform, you can fine-tune and dynamically modify the resources and services in your cluster to match changing application requirements with this practical exercise.
Lab 49: Remove node pool, pods, and services
You will delete services, pods, and node pools from a Kubernetes cluster in Google Kubernetes Engine (GKE) during this lab. To manage charges and free up cluster capacity, you will delete the listed resources using the Google Cloud Console or the kubectl command-line tool. This tutorial shows you how to effectively scale up and down resources in your Kubernetes cluster on the Google Cloud Platform as needed.
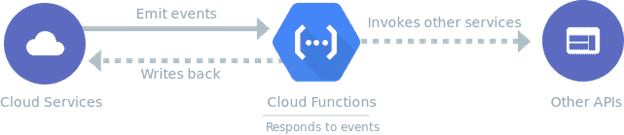
Lab 50: Creating the first cloud function
You will develop your first cloud function in Google Cloud Platform (GCP) during this lab. You can define the function’s code and configuration, including its trigger and execution environment, using the Cloud Functions Console or the command-line interface (CLI). You will gain an understanding of serverless computing through this practical experience, which will make it easy for you to create and launch event-driven applications on GCP.
 Lab 51: Deploying an application that receives Google Cloud events (e.g., Pub/Sub events, Cloud Storage object change notification events)
 Lab 51: Deploying an application that receives Google Cloud events (e.g., Pub/Sub events, Cloud Storage object change notification events)
In this lab, you will set up an application on Google Cloud Platform (GCP) that can receive Google Cloud events. You will set up event triggers, such as Pub/Sub events or Cloud Storage object change notifications, by utilizing Cloud Functions or other serverless solutions. Through the use of this technique, event-driven architectures can be built, facilitating the smooth integration and processing of events into GCP services.
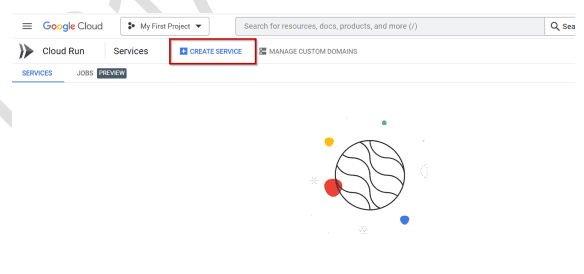
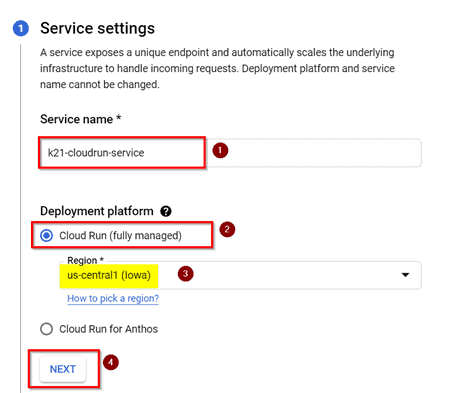
Lab 52: Create Cloud Run
In this lab, you’ll create a Cloud Run service on Google Cloud Platform (GCP). Using the Cloud Console or command-line interface (CLI), you’ll deploy a containerized application to Cloud Run, allowing it to scale dynamically based on incoming traffic. This hands-on exercise demonstrates the simplicity and flexibility of deploying serverless containerized applications on GCP.
 Lab 53: Deploy pre-built sample container to a cloud run
 Lab 53: Deploy pre-built sample container to a cloud run
In this lab, you will use Google Cloud Platform (GCP) to Cloud Run a pre-built example container. You will choose a sample container image from Google and deploy it to Cloud Run using the Cloud Console or the command-line interface (CLI). You will learn how to quickly install and operate serverless applications on GCP that are containerized in this practice.
 Lab 54: Create Cloud Storage Buckets and objects
 Lab 54: Create Cloud Storage Buckets and objects
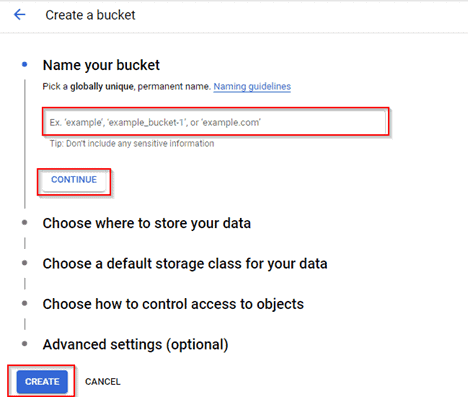
In this lab, You will create Cloud Storage objects and buckets in Google Cloud Platform (GCP) during this experiment. To safely store data in the cloud, you can upload items, set up access controls, and establish bucket names using the Cloud Console or command-line interface (CLI). Through this practical exercise, you will become acquainted with the efficient and effective management of storage resources in GCP’s Cloud Storage service.
 Lab 55: Storage classes in Cloud Storage
 Lab 55: Storage classes in Cloud Storage
You will learn about Google Cloud Storage’s storage classes in this lab. Various storage classes, including Standard, Nearline, and Coldline, will be covered; each is intended for a particular use case and takes cost into account. Knowing the different storage classes in Google Cloud Platform lets you maximize both performance and cost of storage according to the frequency of access and retention needs of your data.
Lab 56: Object Life Cycle Management
You will use Google Cloud Storage to perform object lifecycle management in this experiment. Rules are created to automatically move objects between storage classes or remove them when certain conditions are met, including age or storage time. This procedure automates object lifecycle procedures within the Google Cloud Platform to maximize storage costs and enhance data management efficiency.
Lab 57: Object Versioning and Storage Access Control
In this lab, you’ll explore object versioning and storage access control in Google Cloud Storage. You’ll enable versioning to retain multiple versions of objects, ensuring data integrity and recovery options. Additionally, you’ll configure fine-grained access control policies to manage permissions and secure access to storage resources within the Google Cloud Platform.
Lab 58: Signed URL, Bucket Retention policy, Pricing
You’ll learn how to use signed URLs, bucket retention guidelines, and Google Cloud Storage pricing in this lab. To provide temporary access to objects, you will create signed URLs; to enforce data retention periods, you will build retention policies, and to comprehend the financial consequences, you will investigate pricing models. This all-inclusive strategy guarantees optimized cost management, data retention compliance, and secure access control for Google Cloud Platform’s storage services.
Lab 59: Persistent Disks and Local SSDs
This lab will teach you about Local SSDs and Persistent Discs in the Google Cloud Platform (GCP). For virtual machines (VMs), Persistent Discs offer scalable, long-lasting block storage, while Local SSDs offer fast, transient storage that is directly connected to VMs. Optimizing storage solutions to meet application requirements in GCP environments is made possible by understanding their distinctions and use cases.
Lab 60: Persistent Disks and Snapshots
This lab will introduce you to Google Cloud Platform (GCP) snapshots and persistent drives. Snapshots give a point-in-time backup of disc data, whereas Persistent Discs provide dependable block storage for virtual machines. Enhancing data safety and administration in GCP environments is possible by utilizing snapshots for data backup, recovery, and cloning of Persistent Discs.
Lab 61: Disks and Images using Gcloud
This hands-on exercise demonstrates how to effectively manage disc storage and system images programmatically using GCP’s command-line interface. You will create, delete, and list discs as well as import/export images between GCP projects in this lab, which uses the cloud command-line tool in Google Cloud Platform (GCP).
Lab 62: File Store
You will learn about Filestore, the managed file storage service offered by Google Cloud, in this lab. Filestore instances, which offer scalable and high-performance file storage for applications operating on Compute Engine or Kubernetes Engine, will be created and configured by you. This practical exercise shows you how to use Filestore to efficiently and safely store and transfer files on the Google Cloud Platform.
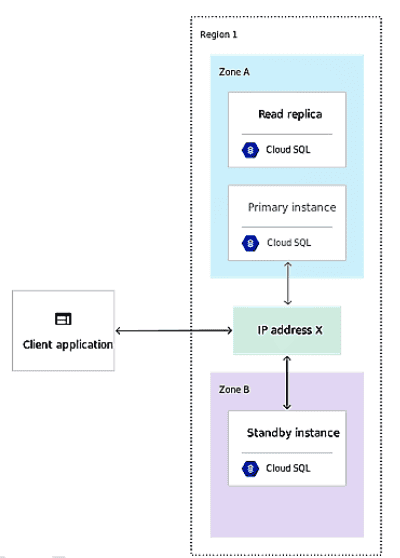
Lab 63: By using SQL instance, Create database and tables – use SQL queries to manipulate it
The goal of this lab is to host a database by creating an SQL instance on the Google Cloud Platform (GCP). Table creation, data insertion, and database content manipulation are all accomplished with SQL queries. To facilitate optimal data storage, retrieval, and manipulation for your applications, this practical exercise shows how to handle relational databases within GCP.
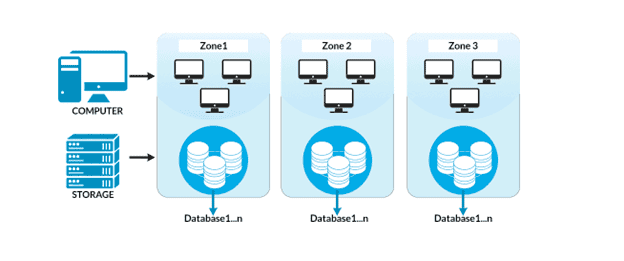
Lab 64: Perform simple operations in cloud spanner
You will perform fundamental operations in Cloud Spanner, the fully managed, horizontally scalable relational database service offered by Google Cloud, in this lab. You will establish databases, specify schema, and insert and query data using SQL-like queries. Using Google Cloud Platform, this hands-on experiment demonstrates how Cloud Spanner can manage transactional workloads with high availability and global consistency.
 Lab 65: Create database and collections and use SQL queries to access it
 Lab 65: Create database and collections and use SQL queries to access it
In this lab, you’ll Create a database and collections in a NoSQL database system such as MongoDB or Google Cloud Firestore during this experiment. Performing actions like inserting, updating, and querying data within collections, you’ll communicate with the database using SQL-like queries. Your knowledge of database administration and querying strategies will grow via this practical experience, which makes it easier for your apps to store and retrieve data effectively.
 Lab 66: Design cloud bigtable schema
 Lab 66: Design cloud bigtable schema
You will create a schema in this lab for Cloud Bigtable, a fully managed NoSQL database service offered by Google Cloud. Column families, keys, and data structures that are optimized for effective data storage and retrieval will be defined. Using Google Cloud Platform, this practical exercise demonstrates best practices for creating high-performance, scalable schemas that meet particular application requirements.
Lab 67: Create and manage cloud bigtable instances
In this lab, you will use Google Cloud Platform (GCP) to create and manage Cloud Bigtable instances. You can specify instance configurations, such as storage capacity and replication settings, using the Cloud Console or the command-line interface (CLI). Through practical application, you will learn how to provide and manage high-performance, scalable NoSQL databases on GCP that are customized to meet your application requirements.
 Lab 68: Creating datasets and tables with schemas Write SQL queries to access the data
 Lab 68: Creating datasets and tables with schemas Write SQL queries to access the data
In this lab, you will utilize Google BigQuery, GCP’s fully managed data warehouse solution, to create a dataset and tables with schemas. You will insert, edit, and query data in these tables using SQL queries, showcasing BigQuery’s robust querying features. This practical exercise demonstrates how to use SQL in the BigQuery environment on the Google Cloud Platform to effectively manage and analyze huge datasets.
Lab 69: Exploring table-creating types
You will learn about several techniques for Google BigQuery table creation in this lab. Explicit schema definition, auto-detection, and external table construction will be covered. Throughout the Google Cloud Platform, this hands-on activity offers insights into multiple methods for organizing and feeding data into BigQuery tables.
Lab 70: Create and manage scheduled queries
You will build and manage Google BigQuery scheduled queries in this experiment. You can create SQL queries and schedule them to run at predetermined intervals using the BigQuery Console. This practical exercise shows you how to use BigQuery in Google Cloud Platform to automate data processing processes and provide regular reports.
Lab 71: Get an idea about the data transfer service
You will learn about Google Cloud Platform’s (GCP) Data Transfer Service in this lab. You will investigate how it makes data transfers into BigQuery or Cloud Storage easier from a variety of sources, including AWS S3, Google Cloud Storage, and others. This presentation sheds light on the Data Transfer Service’s capabilities for effectively importing data into GCP for storage and analysis.
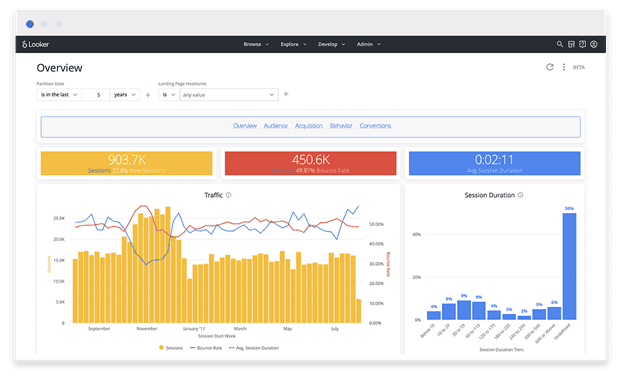
Lab 72: Connect your data in Looker Studio and do analytics
In this lab, you will link your business intelligence platform, Looker Studio, to your data sources. You will do analytics and visualizations after defining data linkages and metrics using the LookML modeling language. Looker’s capabilities for data exploration, analysis, and reporting within the Google Cloud Platform are demonstrated in this practical example.
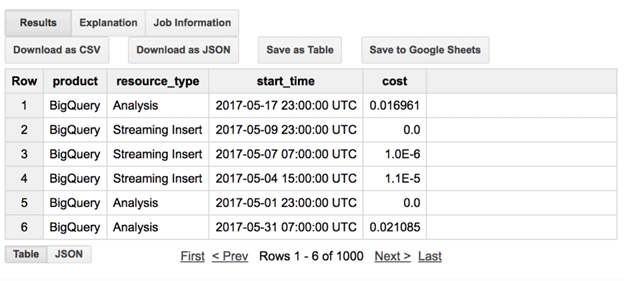
 Lab 73: Examine billing data with a big query
 Lab 73: Examine billing data with a big query
In this lab, you will use the querying features of Google BigQuery to evaluate billing data. BigQuery’s public datasets contain billing data that you can access and use SQL queries to examine consumption trends and expenses. This hands-on exercise shows you how to use BigQuery on the Google Cloud Platform for cost control and optimization.
 Lab 74: Creating topic and subscription and managing messaging service.
 Lab 74: Creating topic and subscription and managing messaging service.
In this lab, you will build a subject in the messaging service Google Cloud Pub/Sub and create a subscription. To receive messages, you’ll create a subscription and define a topic to which messages can be published using the Cloud Console or command-line interface (CLI). This practical experience shows how to effectively manage messages within the Google Cloud Platform between apps and services.
Lab 75: Data flow- Create jobs for transferring data from one resource to another resource
You will develop Dataflow jobs in this lab to move data between Google Cloud Platform (GCP) services. You may create data processing pipelines to read, transform, and output data using the Apache Beam SDK. This practical exercise shows how to use GCP’s Dataflow service to efficiently execute batch or stream processing activities and orchestrate data transfers.
Lab 76: Data fusion- Exploring connectors and pipeline Cloud composer
In this lab, you’ll Discover Cloud Data Fusion, the completely managed data integration service offered by Google Cloud, in this lab with an emphasis on pipeline design and connectors. You’ll also learn how to automate and manage complicated data workflows with GCP’s managed workflow orchestration offering, Cloud Composer. Using Composer for workflow orchestration and Data Fusion for data integration, this practical exercise shows how to simplify data processing and management on the Google Cloud Platform.
Lab 77: Setting up composer environment and views Apache airflows environment variables
In this lab, you will set up a Google Cloud Platform (GCP) Composer system that orchestrates workflows using Apache Airflow. You will discover how to set up environment variables in Airflow to alter settings and behavior. Managing and modifying Composer environments and Apache Airflow workflows within GCP for effective workflow automation and management is made easier with the help of this practical exercise.
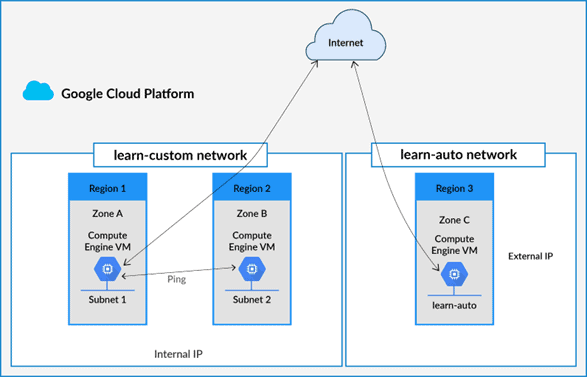
Lab 78: Creating a VPC with subnets (e.g., custom-mode VPC, shared VPC)
In this lab, you will set up subnets to construct a Virtual Private Cloud (VPC) on the Google Cloud Platform (GCP). By specifying IP address ranges and subnet configurations, you will configure both custom-mode and shared VPCs. To safely isolate resources and manage network traffic within GCP environments, this practical exercise shows how to design and set up network infrastructure.
 Lab 79: Launching a Compute Engine instance with custom network configuration (e.g., internal-only IP address, Google private access, static external and private IP address, network tags)
 Lab 79: Launching a Compute Engine instance with custom network configuration (e.g., internal-only IP address, Google private access, static external and private IP address, network tags)
In this lab, you will set up a Compute Engine instance with bespoke network configurations on Google Cloud Platform (GCP). Assign static external and private IP addresses, enable Google Private Access for outgoing connections, set internal-only IP addresses, and apply network tags to firewall rules. This practical exercise shows how to customize network configurations for Compute Engine instances in GCP environments to improve security, usability, and adaptability.
Lab 80: Creating ingress and egress firewall rules for a VPC (e.g., IP subnets, network tags, service accounts)
This lab will teach you how to set up incoming and outgoing firewall rules for a Google Cloud Platform (GCP) Virtual Private Cloud (VPC). To manage traffic flow into and out of the VPC, you’ll create rules based on IP subnets, network tags, and service accounts. Throughout this practical exercise, you will learn how to properly implement network access restrictions and security policy enforcement in GCP environments.
Lab 81: Launching a Compute Engine instance with custom network configuration (e.g., internal-only IP address, Google private access, static external and private IP address, network tags)
In this lab, you will start a Google Cloud Platform (GCP) Compute Engine instance with customized network configurations. Assign static external and private IP addresses, activate Google Private Access, set up internal-only IP addresses, and apply network tags to firewall rules. This practical exercise shows how to modify network parameters for Compute Engine instances in GCP environments to improve security, manageability, and connection.
Lab 82: Creating ingress and egress firewall rules for a VPC (e.g., IP subnets, network tags, service accounts)
This lab will teach you how to set up incoming and outgoing firewall rules for a Google Cloud Platform (GCP) Virtual Private Cloud (VPC). You can improve network security and access control by defining rules to regulate traffic flow into and out of the VPC using IP subnets, network tags, and service accounts. Through this exercise, security policies in GCP settings are effectively enforced, guaranteeing secure and regulated network connectivity.
Lab 83: Detailed overview of Firewall
In this lab, you will learn about Google Cloud Platform’s (GCP) Firewall service, which regulates traffic to and from virtual machine instances. Firewall rules are configured to either permit or prohibit particular types of communication based on protocols, ports, and IP addresses. This practical experience offers insights into how to fine-tune control over incoming and outgoing traffic to manage network security within GCP environments.
Lab 84: Shared VPC
In this lab, you’ll implement a Shared VPC (Virtual Private Cloud) in Google Cloud Platform (GCP), allowing multiple projects to share a common VPC network. You’ll configure host and service projects, enabling centralized network management while maintaining project isolation. This hands-on exercise demonstrates how to streamline network administration and enhance collaboration across projects within GCP environments.
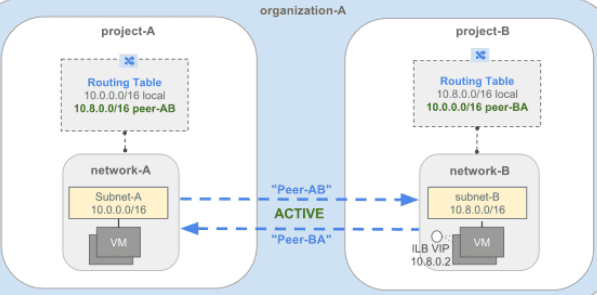
Lab 85: VPC Peering
In this lab, you’ll establish VPC peering connections in the Google Cloud Platform (GCP), enabling communication between virtual private clouds (VPCs) across different projects or regions. You’ll configure peering relationships to allow traffic exchange while maintaining network isolation and security. This hands-on exercise showcases how to expand network connectivity and facilitate inter-project communication within GCP environments through VPC peering.
 Lab 86: Creating and ingesting Cloud Monitoring custom metrics (e.g., from applications or logs)
 Lab 86: Creating and ingesting Cloud Monitoring custom metrics (e.g., from applications or logs)
You will construct custom metrics in this lab and feed them into Google Cloud Platform’s Cloud Monitoring (GCP). Set up monitoring agents or custom code to gather and submit metric data to Cloud Monitoring. Define metrics derived from logs or applications. Using bespoke metrics that are matched to particular application performance and operational parameters within GCP settings, this practical exercise shows how to improve observability.
Lab 87: Configuring log sinks to export logs to external systems (e.g., on-premises or BigQuery)
In this lab, you will set up Google Cloud Platform (GCP) log sinks to export logs to external systems, such as BigQuery or on-premises servers. By defining sinks to transport log data to predetermined locations, Cloud Logging makes it easier to integrate with third-party logging and analysis solutions. To improve log management and analysis within GCP settings, this exercise shows how to expand logging capabilities and interact with external systems.
Lab 88: Configuring log routers, Viewing and filter logs in Cloud logging, Viewing specific log message
In this lab, you will set up Google Cloud Platform (GCP) log routers to route log data to particular locations. You can browse and filter logs with Cloud Logging to extract pertinent data. Furthermore, to properly debug and analyze issues within GCP setups, you’ll search for certain log messages.
Lab 89: Monitoring compute engine instance with resource monitoring
In this lab, you will use Google Cloud Platform’s Resource Monitoring to keep an eye on Compute Engine instances (GCP). Monitoring rules are set up to measure things like CPU usage, disc input/output, and network traffic. This practical exercise shows how to learn about resource usage and instance performance for proactive management and optimization in GCP environments.
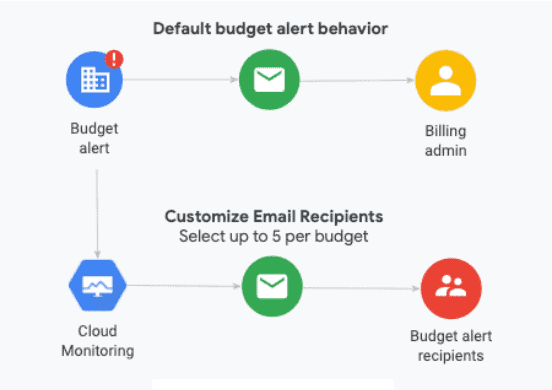
Lab 90: Establishing Billing budgets & alerts
In this lab, you will configure Google Cloud Platform (GCP) alarms and billing budgets. To notify stakeholders when expenditures surpass predetermined levels, you will set budget thresholds and set up email notifications. This practical exercise shows how to monitor billing usage and get timely warnings in GCP environments to efficiently manage and control spending.
Lab 91: Setup billing exports
In this lab, you will set up Google Cloud Platform (GCP) billing exports so that you may export comprehensive billing information to other systems. You can provide export parameters with Cloud Billing to move billing information to BigQuery, Cloud Storage, or a Pub/Sub topic. For financial management and analysis in GCP environments, this exercise makes billing data analysis, reporting, and integration with external systems possible.
 Lab 92: Google Pricing Calculator
 Lab 92: Google Pricing Calculator
This lab will introduce you to the Google Cloud Pricing Calculator, a cost estimation tool for GCP services. To create cost forecasts based on resource utilization and pricing models, you will enter usage parameters and choose desired services. Through cost estimation and resource allocation optimization inside GCP settings, this practical exercise shows how to plan and budget for GCP installations.
Lab 93: Getting started with cloud KMS
In this lab, you will learn how to manage cryptographic keys using Google Cloud Key Management Service (KMS). Along with making keys and keyrings, you’ll also do encryption and decoding. The principles of cloud-based encryption and key management within Google Cloud Platform (GCP) are introduced in this practical exercise.
Lab 94: Creating key ring and crypto key
In this lab, you will use Google Cloud Key Management Service (KMS) to build a cryptographic key and key ring. To generate crypto keys for data encryption and decryption, you will define key rings as containers for cryptographic keys. Through this practical exercise, you will learn the fundamentals of safely managing encryption keys on the Google Cloud Platform (GCP).
Lab 95: Installing and configuring CLI
You will install and set up the Google Cloud Platform (GCP) command-line interface (CLI) tool in this lab. To use the command line to interact with GCP services, download and install the CLI tool on your local computer. This practical exercise is a first step towards effectively managing GCP resources and carrying out administrative duties from your local environment.
Lab 96: Setting up cloud SDK
In this lab, you’ll set up the Google Cloud SDK (Software Development Kit) on your local machine. You’ll download and install the SDK, which includes the cloud command-line tool for interacting with Google Cloud Platform (GCP) services. This hands-on exercise enables you to efficiently manage and deploy GCP resources directly from your command line interface.
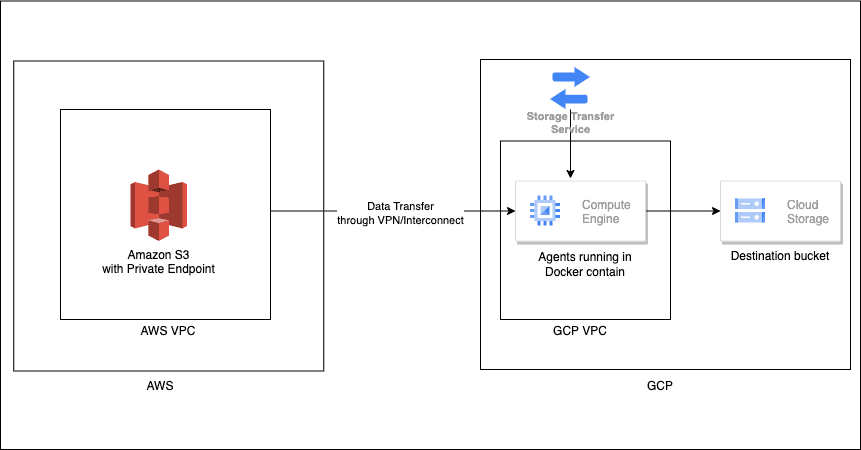
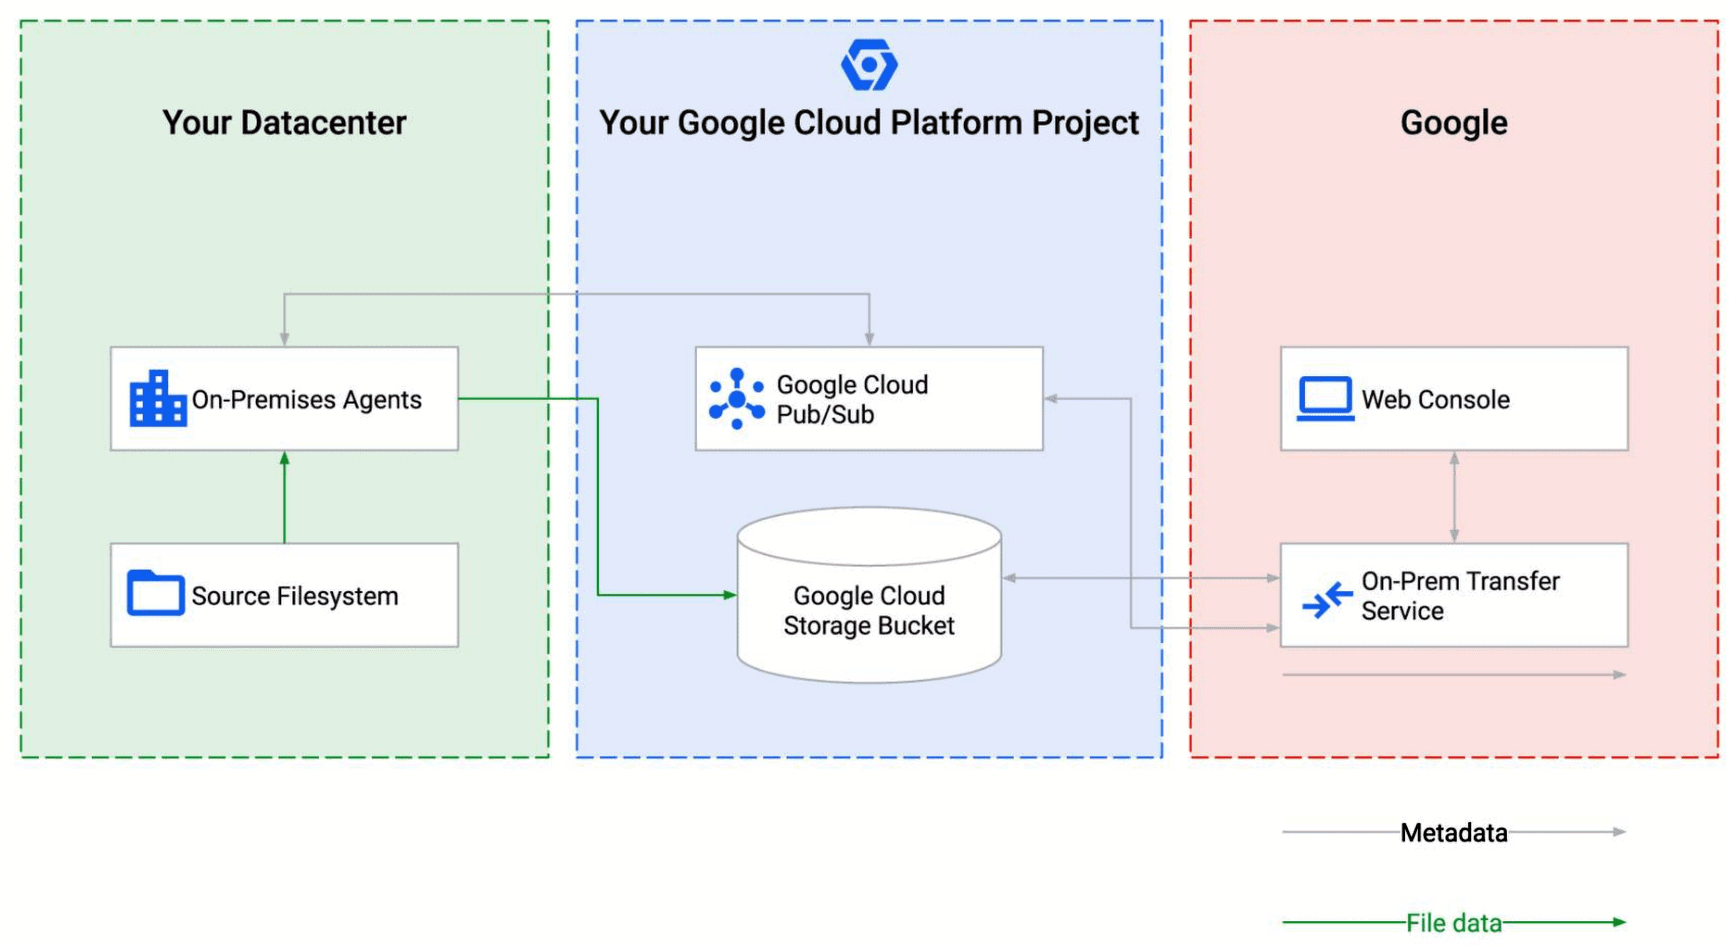
Lab 97: Exploring Storage Transfer Service
In this lab, you’ll explore the Storage Transfer Service in Google Cloud Platform (GCP). This service makes it possible for you to automatically and securely move data across storage sites, including buckets on Google Cloud Storage and other cloud storage providers. To facilitate data migration, backups, and syncing within GCP environments, you will configure transfer jobs to move data efficiently.
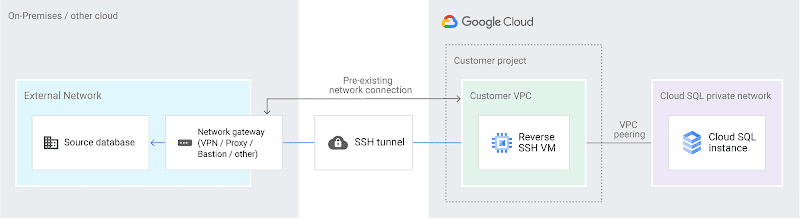
 Lab 98: Database migration service
 Lab 98: Database migration service
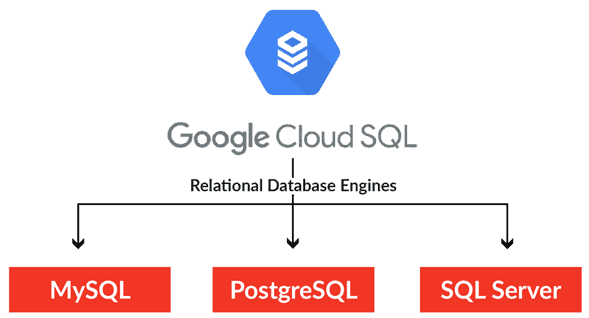
You will learn about Google Cloud Platform’s Database Migration Service in this lab (GCP). With support for several source databases, including MySQL, PostgreSQL, and SQL Server, this solution makes it possible to migrate databases to GCP smoothly. Mitigation jobs are designed to provide minimal downtime during data replication, hence promoting seamless migrations to GCP’s managed database services.
 Lab 99: big query data transfer service
 Lab 99: big query data transfer service
This lab will allow you to investigate Google Cloud Platform’s BigQuery Data Transfer Service (GCP). This program transfers data automatically into BigQuery for analysis from other sources, including Google Cloud Storage, Google Ads, and more. Setting up data transfer jobs will expedite data intake, allowing BigQuery to provide rapid analysis and insights.
 Next Task For You
 Next Task For You
If you are also interested and want to know more about the Google Professional Cloud Architect certification, register for our Free Class.


Leave a Reply